Introduction
There are some situations where you are building a site with a left hand side menu and the menu and the body parts are both floated left to show up next to each other. However, the content of the menu and the content are both dynamic and thus you cannot manually specify the height for either of these. So you need to make sure they are both the same height, what I am showing you now does not actually make both columns the same height, but it gives the impression that they are the same height.
Floating the two columns
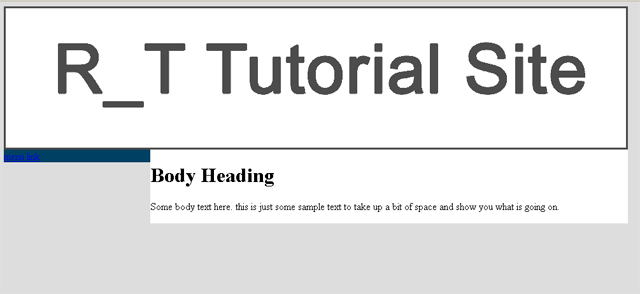
This shouldn't be an issue for you as you are coming to this tutorial with two divs that are already floated next to each other, but let's just have a quick look at what that code will look like, and what the output will be.
The code:
<!DOCTYPE html PUBLIC "-//W3C//DTD XHTML 1.0 Strict//EN" "http://www.w3.org/TR/xhtml1/DTD/xhtml1-strict.dtd">
<html xmlns="http://www.w3.org/1999/xhtml" xml:lang="en" lang="en">
<head>
<title>R_T Tutorial</title>
<style type='text/css'>
body{
background-color:#dddddd;
}
div#container{
width:980px;
margin:0px auto 0px auto;
}
div#header{
width:980px;
height:225px;
background-image:url('images/header.gif');
}
div#body_container{
width:980px;
}
div#menu_left{
width:230px;
background-color:#004163;
float:left;
}
div#body{
background-color:#ffffff;
width:750px;
float:left;
}
</style>
</head>
<body>
<div id='container'>
<div id='header'></div>
<div id='body_container'>
<div id='menu_left'>
<a href='#'>menu link</a>
</div>
<div id='body'>
<h1>Body Heading</h1>
<p>Some body text here. this is just some sample text to take up a bit of space and show you what is going on.</p>
</div>
</div>
</div>
</body>
</html>
your output should now look something like this:
Making them the same height
To now make the two columns the same height, there are three things we need to do, namely:
- Give the "body_container" div a background image
- Give the "body_container" div a background-color
- Add a div with clear:both inside the "body_container" div
Adding the background image:
the background-image is going to be the same width and colour as the "menu_left" div and one pixel high, we will then repeat this background-image all the way down for if the "menu_left" div is shorter than the "body" div.
div#body_container{
background-image:url('images/body_background_cheat.gif');
background-position:top left;
background-repeat:repeat-y;
}
Applying the background-color:
we are going to make the background-color the same colour as the "body" div, this will then make it look as if the "body" div is just as high as the "menu_left" div even if it isn't.
div#body_container{
background-image:url('images/body_background_cheat.gif');
background-position:top left;
background-repeat:repeat-y;
background-color:#ffffff;
}
Adding the "clear:both" part
We'll add a div underneath the two floated divs with the property "clear:both" to make the "body_container" div extend all the way to the bottom of the two floated divs, and here is the code for that one:
div.clear{
width:100%;
height:0px;
clear:both;
}
now please note, the "height:0px;" part will not work in IE6, it will be 5px tall, IE6 doesn't allow a div that is less than 5px tall for some obscure reason.
Anyway, now you'll add this div beneath the two floated divs and then you'll be all set.
The final output
Once you've added all this your code should look like the following:
<!DOCTYPE html PUBLIC "-//W3C//DTD XHTML 1.0 Strict//EN" "http://www.w3.org/TR/xhtml1/DTD/xhtml1-strict.dtd">
<html xmlns="http://www.w3.org/1999/xhtml" xml:lang="en" lang="en">
<head>
<title>R_T Tutorial</title>
<style type='text/css'>
body{
background-color:#dddddd;
}
div#container{
width:980px;
margin:0px auto 0px auto;
}
div#header{
width:980px;
height:225px;
background-image:url('images/header.gif');
}
div#body_container{
width:980px;
}
div#menu_left{
width:230px;
background-color:#004163;
float:left;
}
div#body{
background-color:#ffffff;
width:750px;
float:left;
}
div#body_container{
background-image:url('images/body_background_cheat.gif');
background-position:top left;
background-repeat:repeat-y;
background-color:#ffffff;
}
div.clear{
width:100%;
height:0px;
clear:both;
}
</style>
</head>
<body>
<div id='container'>
<div id='header'></div>
<div id='body_container'>
<div id='menu_left'>
<a href='#'>menu link</a>
</div>
<div id='body'>
<h1>Body Heading</h1>
<p>Some body text here. this is just some sample text to take up a bit of space and show you what is going on.</p>
</div>
<div class='clear'></div>
</div>
</div>
</body>
</html>
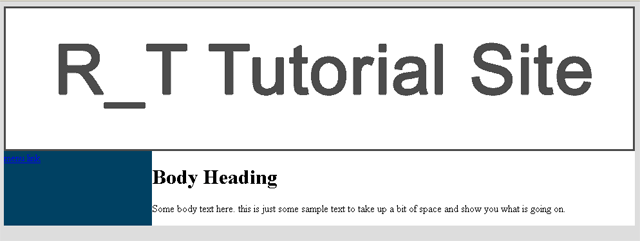
and it should look like this:
Conclusion
Making this work is very simple, all you need to remember is that we added a body_container around the two floated divs, and gave that "body_container" div a background-image (1px x menu's width) and a background-color (the same colour as the "body" div's background) ... then we added a div with "clear:both" to make sure the "body_container" div stretches all the way to the end of the floated divs.
Hope this helps a bit
This page was published on It was last revised on