This is the first half of a follow-along tutorial, please download and unzip the photoshop file at the bottom of this guide to follow along.
This tutorial explicates slicing images with Photoshop CS3; people using earlier versions of Photoshop may not have some options used herein, but should still be able to follow along without too much hindrance.
Introduction
If you haven't heard, Photoshop has the ability to cut a single image into many images, optimizing each piece separately, and then writing its own HTML code that pieces those images back together in the same layout as the original so it's viewable on a browser. I'd like to show you the benefits and techniques of accomplishing such a task. This is part 1 of 2 tutorials. This first half will focus on using the slice tool, and slice select tool. The second half focuses on optimizing and saving slices for the web.
Who Needs Words When You Have Picturebooks? – Preparing The Document
Below is a simple layout for a website that I'll be using throughout the tutorial to demonstrate the slice tool and the many options it comes with. You can download the .psd file from the end of this thread to follow along with me.
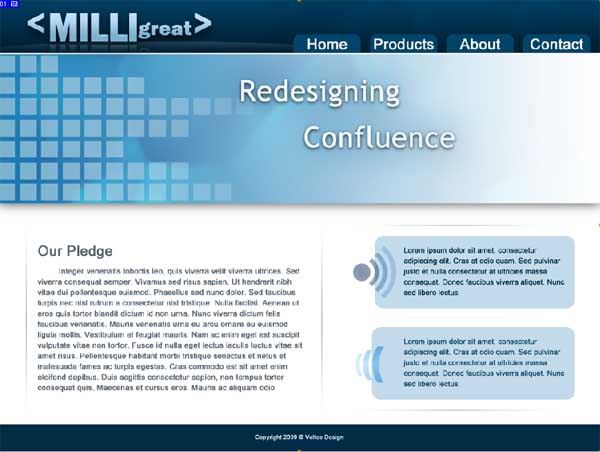
Before we begin cutting up our image, let's prepare it. Go ahead and Turn off any text that won't be part of our webpage images. This should include any paragraphs, link text, footer text, etc. Basically, anything that will be textual content in the HTML markup should be turned off.
A good idea to save time is to put all of your textual content layers inside of a folder during the design of your layout as I have done. This not only saves time but also keeps your layers nice and tidy so you can find them quicker.
Result:
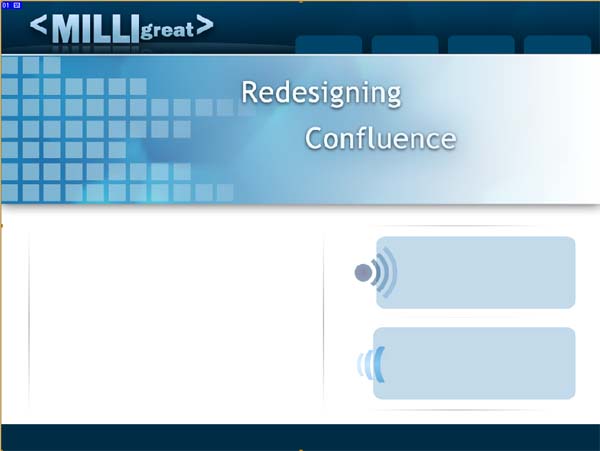
To turn off your text layers, simply click on the small eye next to them in the layers pallet.
The Pen Is no longer Mightier Than The Sword – Using The Slice Tool
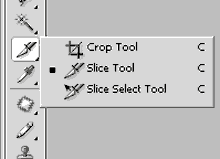
Now that our image is prepared for slicing, let's take a look at our slice tool. Go ahead and press shift+c, or for mac users option+c. You may have to press it twice to get to the slice tool. Your mouse cursor should now look like the tip of an exacto-knife. This, my friends, is the slice tool, and it comes in very handy for website layout mock-ups.
Before we begin using it, there are a few things you should take notice of. Go ahead and glance over to your tools menu; you'll see that the slice tool is located in the first section as an item in the submenu of the crop tool. Hold your mouse over the slice tool icon in the tools menu until you see the fly-out menu. Be sure to have the slice tool selected and not the slice select tool.
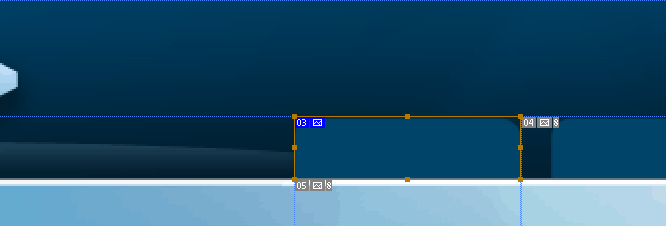
Finally, the moment has come to start cutting our image. Go ahead and click on the top-left corner of one of the navigation bar tabs, then drag your cursor down to the bottom right of that same tab as illustrated below:
Be Lazy, Let Photoshop Do It For You! – User Slices and Auto Slices
Congratulations my friend, you've just created your first "user slice." Any time you drag your cursor to create a slice, that piece is called a user slice. If you notice, in the upper left-hand corner of your slice, you have the number 3. You see, when Photoshop writes the HTML markup that organizes your slices, it uses an HTML table. The number 3 indicates that this slice will be the 3rd cell in that table.
Notice that there are 4 other slices that surround yours that are numbered 1, 2, 4, and 5. These are called "auto slices." Auto slices are automatically generated by Photoshop and represent the rest of the table cells that Photoshop will produce when it creates your markup. Observe that auto slices are differentiated from user slices by having their numbers grey instead of blue.
Let's go ahead and finish off the rest of the navigation bar tabs. Go to your tools menu, back into that fly-out menu where you found your slice tool, and this time select your Slice Selection Tool. This tool, instead of cutting your image, will instead select slices that already exist. Go ahead and hold down ctrl+alt (command+option on a mac), and then click and drag the user slice you created earlier over to the next tab in the navigation bar. As you can see, we actually just copied our original user slice over.
While we have our slice select tool handy, go ahead and zoom in to your user slices and make sure they line up with the tab borders correctly. If they don't, simply select the one that needs to be adjusted, and drag the small grips located in the center of each border in the appropriate direction.
Go ahead and continue copying the slices until you have a slice for each tab in the navigation bar. When you're done, you should end up with something like this:

How Exquisitely Laminiferous - Layer Based Slices
I must say, you're doing fantastic, but we have a problem. Our logo is being split in two!

Hmm, now how should we fix that? I know what you're thinking; just cut it out with the slice tool. Well, we could do that, but I want a little bit more exactness when it comes to the logo. Let's create a layer based slice. Go ahead and click on the Logo layer to select it; then in the menu bar choose Layer>New Layer Based Slice. Voila, we just now encapsulated the logo in a Layer Based Slice automatically.
Layer-based slices have a few benefits and disadvantages. I'll go ahead and list them here:
Benefits:
- Precisely surround the bounding box of a layer
- Automatically adjust to any transformations of the layer (including resizing, moving, etc.)
Disadvantages:
- Are not manually resizable
- Are not well suited for animations that move the layer a large distance
- You cannot copy a layer-based slice to another area
We'll create another layer-based slice for the footer by selecting the background layer in the footer folder and choosing "new layer-based slice" from the layer menu in the menu bar.
Go ahead and try your hand at creating another layer-based slice for the banner by selecting the background layer. The entire banner should be a single slice. Uh oh! What happened? Apparently, the layer extends upwards and into our header.

It's probably because of the drop shadow that's applied to the layer. I don't really want to rasterize the layer styles, but I can't resize the slice because it's a layer style 😟 . I guess we'll have to change it to a different type of slice 🙂
Photoshop Gets A Raise – Promoting Slices
Photoshop doesn't force you to stick with what type of slice you have. Pick up your slice selection tool and look at the options bar. "Promote" allows you to change an auto slice or a layer-based slice to a user slice. Click on the promote button to change the banner slice to a user slice and notice that the slice edges now have grips in their centers for resizing. Let's pull the top border down to just beneath the header of our layout. Well done, I think the banner is done.
See the auto slice below the banner that fills the lower half of the page? Right-click on it with your slice or slice select tool and click on "divide slice." A dialog box will appear that allows you to split the slice horizontally or vertically as many times as you want. We want to divide this slice by 2 both vertically and horizontally; so check each check box and type in "2" next to each radio button that says "evenly spaced," and then click ok. We just now did two things at once: we divided the auto slice into 4 separate slices, and also promoted them to user slices.
Severing The Ties That Bind Us – Dividing And Combining Slices
Now we can drag the horizontal center line that divides the top two and bottom two slices until it splits evenly between the text areas on the right of the body, and move the vertical centerline a little closer to the symbols.
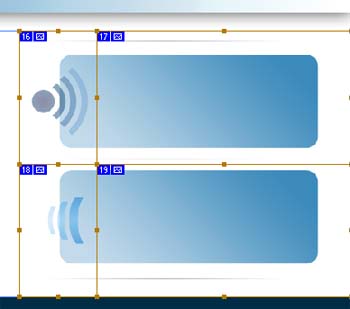
Now we have a large area on the left that needs to be a single cell in the table. Click on the top half of the large body area and hold down shift while clicking the lower half. We have just now selected multiple slices. Choosing multiple slices at once allows you to affect both slices at once; whether it be resizing the border between them, copying them, dividing them, or in this case combining them. Right-click on one of the two slices you've just selected and choose "Combine Slices" from the menu.
Are We There Yet? No. Are We There Yet? No. Are We… – Preparing To Save
Congratulations, we're done slicing up our image. Finally, we can give each slice a special identity, and give it a few hints to tell Photoshop how to write the markup.
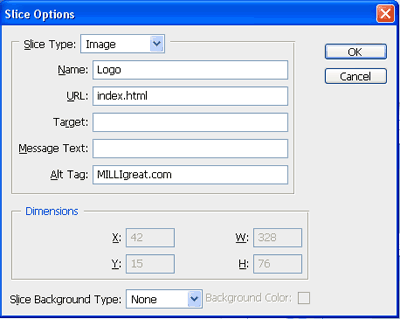
Right-click on the slice which surrounds the logo and choose "Edit Slice Options" from the menu. A dialog box appears that allows you to edit a few properties of the image. Give it the name "Logo." Any name we define in this dialog for each slice corresponds to what Photoshop will name the image file when we save the slices for the web. In other words, we named this slice "Logo," so the file of the slice will be named "Logo." A few other options exist here like URL, Target, Message Text, and Alt Tag. Each of these affects how Photoshop will write its tag attributes in the markup. Let's give the logo a URL of "index.html" so that when the user clicks on the logo, they're brought to the homepage. Next, type in "MILLIgreat.com" in the Alt Tag area; this tells Photoshop to generate an alt attribute in the image tag with "MILLIgreat.com" as its content. Click ok to save the changes to that slice.
Now, how about we set up our navigation bar? In the layers palette, navigate to the "Links" subfolder in your header folder and turn on the visibility for the "text" folder. We'll use this as a guide for adding content to our tabs. Double click on the "Home" tab in the navigation bar of our layout. This will open up our "Edit Slice Options" dialog. Name this slice "Home" and click ok. Complete the rest of the navigation bar with this pattern, naming each slice with its corresponding text. When you're finished, turn your link text off again and continue naming your slices until you get to the footer. Your slice names should be definitive in relation to what the slice contains, and be as short as possible.
When you get to the footer, we're going to do something a bit different since it's a solid color. Double click on it to open your "Edit Slice Options" dialog. Under the "Slice Type" drop-down menu, choose "No Image." This tells Photoshop not to save this image but still generate the markup for the table cell. When you chose "No Image" the contents of your dialog box changed to having a multiline text input box asking for the text that will be displayed in the box. Type in whatever information you'd like; for instance, I chose "© Copyright 2009 Voltec Design." At the bottom of the dialog box is an option to choose a background color. Choose "Other…" from the drop-down menu and use your eyedropper tool to select the color within the footer of your layout. When Photoshop creates the markup for your footer cell, it will now display the textual content you provided from within Photoshop, and set the cell's background color to the color you just chose. Click ok.
Conclusion
Well done, we've finally completed the first half of using the slice. You now know how to use the slice tool, the slice select tool, how to edit slice properties, and the different types of slices. Unfortunately, you've only learned how to use the slice tool but not why. If you have the time and need the know-how; take a look at PART II of this tutorial where I explain the ways in which the slice tool can save massive amounts of time for web designers during drafting through the "Save For Web & Devices" Dialog.
This page was published on It was last revised on
