The short answer is to setup Redis with the following ACL:
acl setuser USERNAME on >PASSWORD ~PREFIX:* +select +get +flushdb +del +set +setex +info +ping +eval +zadd
and then wp-config.php to have the following lines:
define('WP_REDIS_PASSWORD', ['USERNAME', 'PASSWORD']);
define('WP_REDIS_PREFIX', 'PREFIX:');
That will allow you to have WordPress Object Caching work with Redis where you are using ACLs. If you have multiple users or websites on the server, you can assign each their own unique username, password, and prefix to prevent any sort of unauthorized access or collisions. Below I will take you through more details in case you want to be walked through it.
Enabling Redis users.acl
If you look at redis.conf, there are some instructions in there regarding how Redis ACL users are defined:
# Redis ACL users are defined in the following format:
#
#   user <username> ... acl rules ...
#
# For example:
#
#   user worker +@list +@connection ~jobs:* on >ffa9203c493aa99
That format can be used to define user ACLs inside the actual redis.conf file or a users.acl file. If you want to use the users.acl file then in the redis.conf you will need to uncomment the following:
aclfile /etc/redis/users.acl
Then create the file, set proper permissions, and restart Redis:
cd /etc/redis/
chown redis.root users.acl
chmod 640 users.acl
systemctl restart redis
If everything works after restarting Redis, then you did things correctly. Otherwise, look closely at any error messages to fix your issues. You can now use the Redis users.acl file. Additionally, your paths may vary, these were the paths to use for AlmaLinux 9.3.
Setting up a Redis ACL
From here you can either work directly with this users.acl file to set up ACLs or use the redis-cli to make changes and then persist to the file you just configured. There is a slight syntax difference between the user.acl file vs the redis-cli. With the CLI the commands to create or change ACLs on the user will be in this form:
acl setuser USERNAME ...
Whereas in the users.acl file it will simply be:
user USERNAME ...
For a WordPress website where we want to use Redis Object Caching, we would want to create a user in the users.acl file like this:
user USERNAME on #hashedPassword ~PREFIX:* &* -@all +select +get +flushdb +del +set +setex +info +ping +eval +zadd
This ACL does the following:
- Creates/Updates USERNAME
- Enables the ACL via the USERNAME (on vs off)
- Allows USERNAME to be authed via a password
- Allows USERNAME access to all keys that begin with PREFIX:
- Allows USERNAME access to all Pub/Sub channels (&*)
- Disallows all commands to USERNAME (-@all)
- Then allows USERNAME to use the commands: select, get, flushdb, del, set, setex, info, ping, eval, and zadd
So in other words, this will create a username, password to utilize, a set of keys that they have access to, and restrict all commands except for the ones added here with plus signs. The ones I specified here are the commands you will need for WordPress Object Cashing with Redis. I would recommend checking out all of the ACL Rules that are possible.
However, I think it is easier to set this from the redis-cli, as it will do all of the work to properly hash any passwords and store them correctly for you in the users.acl file.
Using the Redis-CLI to Configure an ACL
First, you will want to gain privileged access to the CLI (we are assuming the root/master password is password123456):
redis-cli
auth password123456
Then run the following commands to have the ACL created and saved:
acl setuser USERNAME on >PASSWORD ~PREFIX:* +select +get +flushdb +del +set +setex +info +ping +eval +zadd
acl save
This will provide you full access to the redis-cli, then create the USERNAME with the PASSWORD. Please note the change in syntax in that >PASSWORD is the actual password you want to use.
Whatever you put for PREFIX is the only keys the user will have access to here. Notice the wildcard being used, so if I was to put the PREFIX as ozzu:*, then my user would only have access to any keys that start with ozzu:, everything else I would be denied. Thus by doing this and providing each user their own access to a unique prefix, you can keep everything separate and protected.
Once you run acl save, it will then export all current ACLs into the users.acl file. It will only use the hashed versions of passwords so that the real passwords cannot be read.
Setup WordPress Object Caching to Access Redis with ACLs
With the above setup of Redis, the last step is to ensure that you are passing enough information into WordPress to be able to connect correctly to Redis. To do that you will want to add the following to wp-config.php:
define('WP_REDIS_PASSWORD', ['USERNAME', 'PASSWORD']);
define('WP_REDIS_PREFIX', 'PREFIX:');
// define( 'WP_REDIS_DATABASE', 0 ); // 0-15
// define('WP_REDIS_DISABLED', false);
You can optionally put users onto a different Redis DB, but while there are a few hacky ways to restrict access via DB number, it is not dependable so I am not going to recommend it. Thus I am just leaving it commented out, but including it in case you need to specify a different DB number. Usually, the default where it is commented out or not included is sufficient.
The last line is handy in that if you have any issues and your configuration is not correct, you can easily set WP_REDIS_DISABLED to true, and then your website will load normally without Redis instead of being down.
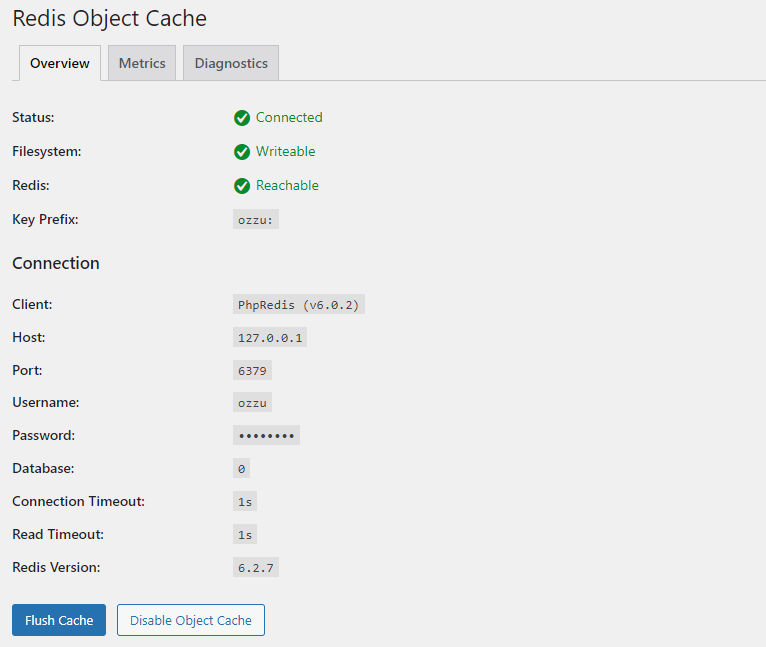
Once you have everything set, you should be able to verify that Redis is Reachable according to the Redis Object Cache: