I am answering my own question, but before diving into the details of how everything works, here's a quick summary of the steps you need to take:
- Install Remi Repository
- Install a default PHP version
- Install PHP versioned Software Collections
How you install the Remi Repository may vary slightly between operating systems, but it's still very easy to do, and I will cover that shortly. Once you have that installed, here is an example of all you need to do to install a default and alternative PHP versions:
dnf module reset php
dnf module install php:remi-8.3
dnf install php81 php82 php83
It's quite simple! After running the above commands, you will achieve the following:
- PHP 8.3 will be the default
- PHP 8.1, 8.2, and 8.3 can all be used directly, regardless of what the default is
- The default set of PHP modules will be installed too for each version
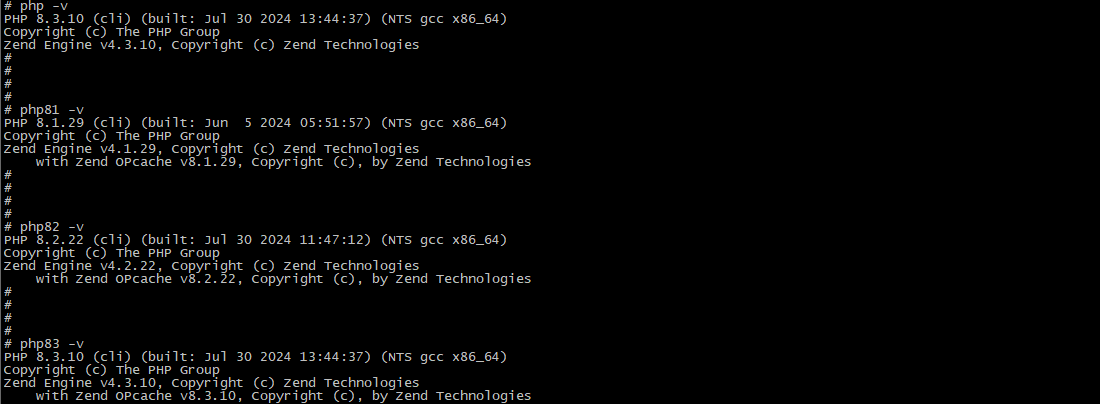
There is nothing else you need to do, and you only need to read further if you want more details on how everything works or want some basic guidance to setting up PHP-FPM and configuring Apache to proxy PHP requests to it.
Remi RPM Repository
The Remi Repo is a free and stable repository mainly for the PHP stack that supports the following operating systems:
- Red Hat Enterprise Linux 8.x and 9.x
- CentOS Stream 9
- Alma Linux and Rocky Linux 8.x and 9.x
- Fedora Linux 38, 39, and 40
It tends to stay up-to-date with the latest versions of PHP, including the most recent minor releases. Without it you might be waiting awhile before you can use newer versions of PHP. For example, as of this writing if I install AppStream's version of PHP 8.2, and then check the exact version that was installed, it is: PHP 8.2.13. If I install PHP 8.2 from the Remi repository, the exact version installed is PHP 8.2.21.
There is a fantastic wizard that allows you to input your operating system, desired PHP version, single/multi versions, and architecture and providing you a quick summary of the commands to run to not only install Remi Repository, but how to setup PHP. For example, since I just did some of this on AlmaLinux 9, I ran the following to install the Remi Repo:
dnf install https://dl.fedoraproject.org/pub/epel/epel-release-latest-9.noarch.rpm
dnf install https://rpms.remirepo.net/enterprise/remi-release-9.rpm
This will install epel release (a required dependency), and remi release. I will now have access to install the latest versions of PHP, which as of this writing is PHP 8.3:

You can see from that image that without Remi Repo I could install either PHP 8.1 or 8.2, and with Remi Repo I could additionally install PHP 7.4, 8.0, and 8.3. Also you should know that Remi's versions will also usually be up-to-date on the latest minor releases while AppStream will not, thus I would use Remi for any of the major versions you want to use.
Finally, while it doesn't make it clear from the screenshot, the Remi Repo also enables you to install PHP as versioned software collections which is the key to allowing you to easily have multiple versions of PHP on the same server.
Query versions of PHP installed
One of the first things you might do after accessing your newly provisioned server, is to see what version(s) of PHP are already installed, if anything. There are multiple ways this can be done:
dnf list installed php*
dnf list installed | grep php
The commands are similar, the first only provides modules that match php with a wildcard, and the other will list all modules that contain php. If php is installed, you can see the default running by typing:
php -v
For instance the result of that might be:
PHP 8.3.10 (cli) (built: Jul 30 2024 13:44:37) (NTS gcc x86_64)
Copyright (c) The PHP Group
Zend Engine v4.3.10, Copyright (c) Zend Technologies
    with Zend OPcache v8.3.10, Copyright (c), by Zend Technologies
In this case you can see that the default php version is 8.3. Also you can see we accessed PHP directly from the command line interface (cli), but often times we will need to access PHP due to a request to an Apache Web Server (for example, loading a web page).
Installing the Default or Single version of PHP and PHP-FPM
If you don't need multiple versions of PHP available on your system for different websites/users, than just installing a single system version of PHP would be sufficient:
dnf module list php
dnf module reset php
dnf module install php:remi-8.3
For the dnf module commands, the first one which runs dnf module list php will output all versions of PHP streams available to install on your system. If you did not install the Remi repository above, your list of available PHP versions will likely be more limited. Once you have confirmed that the version is available that you would like to install, then you would run dnf module reset php to reset the installation configuration, and dnf module install php:remi-8.3 (or whatever), to install PHP. If this is your first time installing PHP on your system, this will not only install PHP, but will install a default set of PHP modules as well including: php-cli, php-common, php-fpm, php-mbstring, and php-xml.
If you already had PHP installed on your system, then the dnf module install php:stream-version will again install a default set of PHP modules in addition to any extra modules you had installed on your last version. I think this is a great feature, because if you have installed additional PHP modules like I do to support a website, then it will automatically install those on any new versions so you don't have to fine tune everything again.
If at this point you are missing PHP modules you need to have installed, or perhaps you have installed some PHP modules you realize you don't need, you can run commands like the following to add/remove them:
dnf install php-imagick
dnf install php-redis
dnf install php-mailparse
dnf remove php-xml
The next time you upgrade or downgrade your default version of PHP, it will remember your additional module selection by default if using the dnf module install command.
Upgrading or Downgrading Default PHP
Since you already have a default PHP installed at this point, all you need to do to change the default PHP version is the following:
dnf module reset php
dnf module install php:remi-8.2
Since I installed the additional modules php-imagick, php-redis, and php-mailparse, and then removed php-xml, you can see that it remembers to include my additional modules when downgrading the default from PHP 8.3 to PHP 8.2:
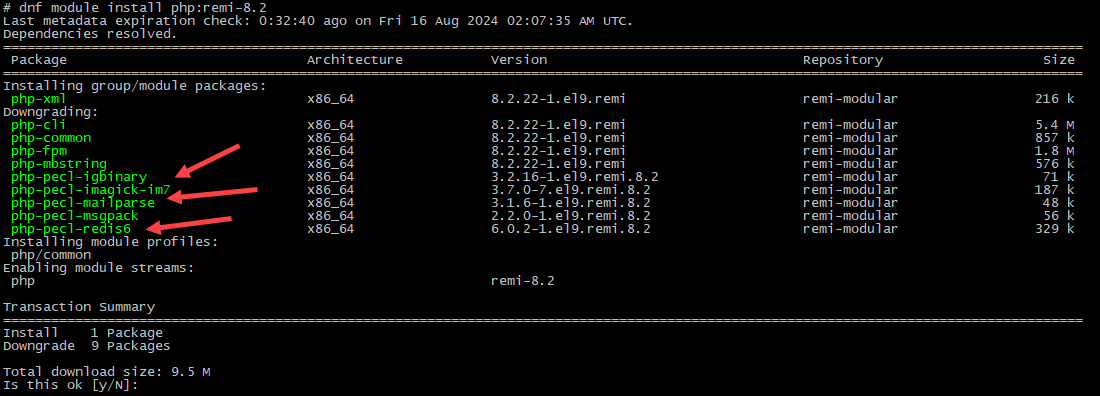
However, since by default PHP-XML is included, that would be restored in this case.
Installing PHP with Exact Modules
If you want to choose exactly what modules are installed, then instead of running dnf module install php:version, you would run dnf module enable php:version. Doing this will not install anything, it will just configure your system to utilize that version for any of the proceeding dnf install commands. So for instance, at this point you can now install PHP with the exact modules of your choosing in one go:
dnf module reset php
dnf module enable php:remi-8.3
dnf install php php-imagick php-redis php-mailparse
Notice that after enabling the version you want to use, the proceeding are actual dnf install commands, not dnf module install commands. This will install PHP along with the default modules, as well as any additional modules you specified, all in one go.
Just like before, if down the road you utilize the module install command for a new PHP version, it will also install your extra modules you added as well making the switch easy.
One issue with this route is that while this works for upgrading, for downgrading it will not work because it will think you already have the most current version.
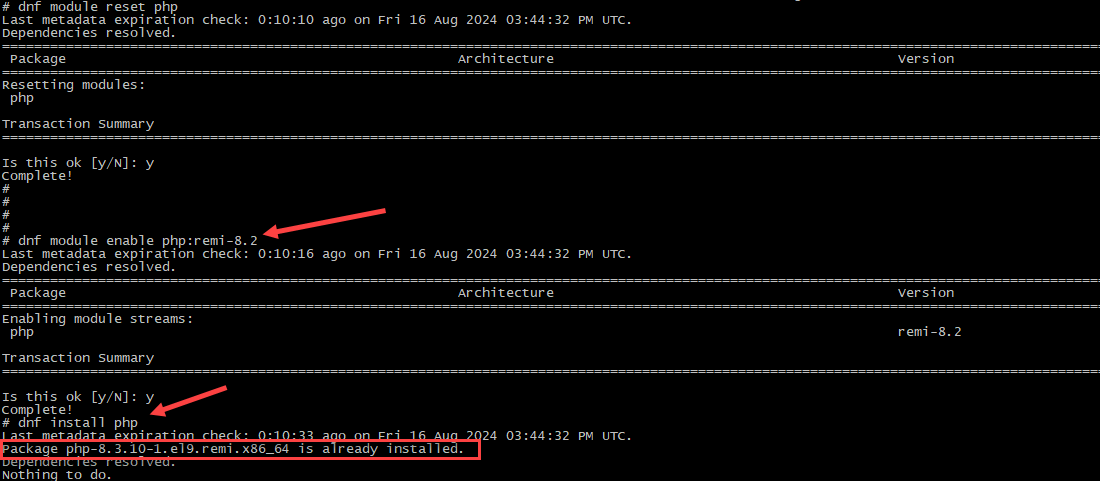
However, if you are more specific and specify the exact version to install, then it would let you proceed with the downgrade. You can use dnf --showduplicates list php to show all installed and available PHP packages you can install. This will include the exact version that you will need to specify. Then you can specify something like this: dnf install php-8.2.21-1.el9.remi. Here is a screenshot of this in action:
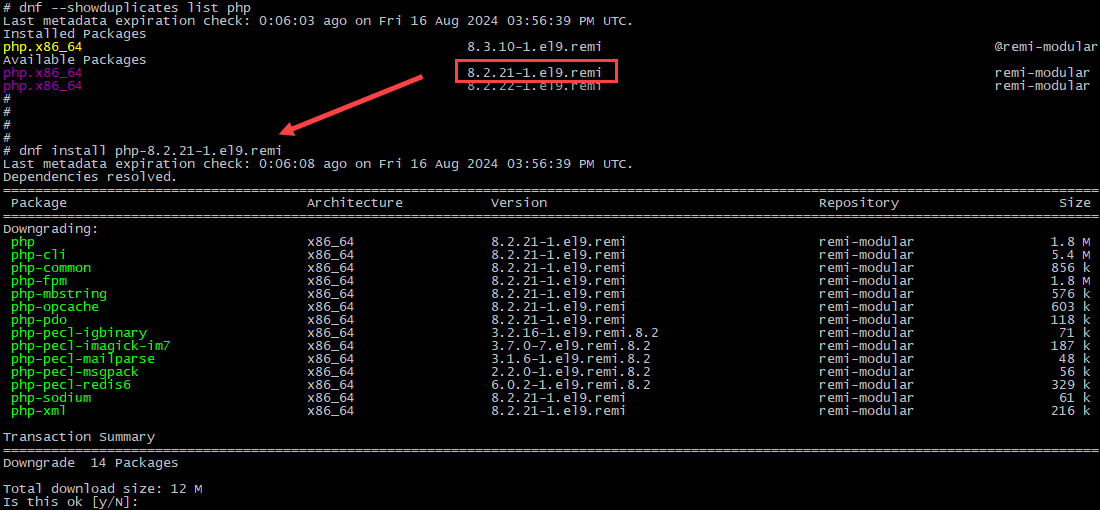
You can certainly go this route, but it might be easier to use the dnf module reset php command followed by dnf module install php:stream since this method works for both upgrades and downgrades.
Installing Multiple versions of PHP and PHP-FPM
If you are in a situation where you need to support multiple versions of PHP, perhaps due to different requirements for active websites on the server, then this next portion will install a default version of PHP, as well as additional alternative versions of PHP that can be used from the CLI or configured for websites.
To support multiple running instances you would then install these as a prefixed software collection. When installing the software collections the following modules will be automatically included whether you specify them or not: php-cli, php-common, php-runtime, php-fpm, php-mbstring, php-opcache, php-pdo, php-sodium, and php-xml. The following would install PHP 8.1, PHP 8.2, and PHP 8.3 with the additional modules selected:
dnf module reset php
dnf module enable php:remi-8.1
dnf install php php-gd php-zip php-imagick php-redis php-mailparse

dnf install php81 php81-php-gd php81-php-zip php81-php-imagick php81-php-redis php81-php-mailparse
dnf install php82 php82-php-gd php82-php-zip php82-php-imagick php82-php-redis php82-php-mailparse
dnf install php83 php83-php-gd php83-php-zip php83-php-imagick php83-php-redis php83-php-mailparse
Essentially, you prefix the package names with phpxx- where xx represents the version number without decimals.
The default version of PHP here would be PHP 8.1, and if you wanted to use any other version you would be explicate by appending the version without decimals on the php binary. So for instance:
php -v
PHP 8.1.29 (cli) (built: Jun  5 2024 05:51:57) (NTS gcc x86_64)

php81 -v
PHP 8.1.29 (cli) (built: Jun  5 2024 05:51:57) (NTS gcc x86_64)

php82 -v
PHP 8.2.22 (cli) (built: Jul 30 2024 11:47:12) (NTS gcc x86_64)

php83 -v
PHP 8.3.10 (cli) (built: Jul 30 2024 13:44:37) (NTS gcc x86_64)
So currently in this situation you would have PHP 8.1, 8.2, and 8.3 installed with PHP 8.1 set as the default. If you wanted to have the exact same versions installed, but switch the default to 8.2, then you would simply run:
dnf module reset php
dnf module install php:remi-8.2
Now the same versions of PHP would be installed, but the default for PHP would be 8.2.
How to Update PHP via DNF
To keep PHP up-to-date with any minor releases you would simply run:
dnf update
That would keep all of your packages up-to-date including PHP's latest minor releases. You could also be explicate if you only wanted to update PHP and not all system packages:
dnf update php*
How to Remove PHP via DNF
Really simple to remove PHP and its associated modules as well. This would remove the default PHP version and PHP 8.1 that you can access directly:
dnf remove php-*
dnf remove php81-*
In this case since I installed the PHP 8.1, 8.2, and 8.3 collections, I would no longer have a default PHP or php81 version available. However, I would still have php82 and php83 available to run since I did not remove those yet.
Switching Repository versions of PHP
If you are no longer wanting to use Remi Repository for your default version of PHP, then to switch my recommendation would be to use the module install command:
dnf module reset php
dnf module install php:8.2
You can see that php:8.2 here is referencing one of the streams available:

Or alternatively completely remove PHP via DNF, then run the install commands for a default PHP:
dnf remove php-*
dnf module reset php
dnf module enable php:8.2
dnf install php
For the second way, without removing it first, you may encounter conflicts similar to:
# dnf install php php-gd php-zip php-imagick php-redis php-mailparse
Last metadata expiration check: 1:08:55 ago on Fri 16 Aug 2024 12:40:47 AM UTC.
Package php-fpm-8.2.22-1.el9.remi.x86_64 is already installed.
Package php-cli-8.2.22-1.el9.remi.x86_64 is already installed.
Package php-common-8.2.22-1.el9.remi.x86_64 is already installed.
Package php-mbstring-8.2.22-1.el9.remi.x86_64 is already installed.
Package php-pecl-imagick-im7-3.7.0-7.el9.remi.8.2.x86_64 is already installed.
Package php-pecl-redis6-6.0.2-1.el9.remi.8.2.x86_64 is already installed.
Package php-pecl-mailparse-3.1.6-1.el9.remi.8.2.x86_64 is already installed.
Error:
 Problem 1: cannot install both php-common-8.1.29-2.el9.remi.x86_64 from remi-modular and php-common-8.2.22-1.el9.remi.x86_64 from @System
  - package php-8.1.29-2.el9.remi.x86_64 from remi-modular requires php-common(x86-64) = 8.1.29-2.el9.remi, but none of the providers can be installed
  - cannot install the best candidate for the job
 Problem 2: cannot install both php-common-8.1.29-2.el9.remi.x86_64 from remi-modular and php-common-8.2.22-1.el9.remi.x86_64 from @System
  - package php-gd-8.1.29-2.el9.remi.x86_64 from remi-modular requires php-common(x86-64) = 8.1.29-2.el9.remi, but none of the providers can be installed
  - package php-fpm-8.2.22-1.el9.remi.x86_64 from @System requires php-common(x86-64) = 8.2.22-1.el9.remi, but none of the providers can be installed
  - cannot install the best candidate for the job
  - package php-common-8.2.22-1.el9.remi.x86_64 from remi-modular is filtered out by modular filtering
 Problem 3: package php-pecl-zip-1.22.3-1.el9.remi.8.1.x86_64 from remi-modular requires php(api) = 20210902-64, but none of the providers can be installed
  - package php-pecl-zip-1.22.3-1.el9.remi.8.1.x86_64 from remi-modular requires php(zend-abi) = 20210902-64, but none of the providers can be installed
  - cannot install both php-common-8.1.29-1.el9.remi.x86_64 from remi-modular and php-common-8.2.22-1.el9.remi.x86_64 from @System
  - cannot install both php-common-8.1.29-2.el9.remi.x86_64 from remi-modular and php-common-8.2.22-1.el9.remi.x86_64 from @System
  - package php-cli-8.2.22-1.el9.remi.x86_64 from @System requires php-common(x86-64) = 8.2.22-1.el9.remi, but none of the providers can be installed
  - cannot install the best candidate for the job
  - package php-common-8.1.27-1.module_el9.3.0+53+44872dd1.x86_64 from appstream is filtered out by modular filtering
  - package php-common-8.2.22-1.el9.remi.x86_64 from remi-modular is filtered out by modular filtering
If you see that, all you need to do is uninstall PHP first, and then try again.
Apache PHP Handlers
Everything above simply discusses how to have multiple versions of PHP available on your system. It does not discuss how to configure what version would be associated with what website. For instance, if using Apache, you could configure different websites to have different PHP handlers which are pointed to different PHP versions.
Apache doesn't natively support PHP scripts without a module that understands how to handle the scripts. There are numerous available:
- DSO/mod_php
- CGI
- FCGI/FastCGI
- suPHP
- PHP-FPM
The first one, mod_php is a popular Apache module that allows Apache itself to directly parse and run PHP files. The biggest benefit is that it is fast. However, the downsides here are that it will only work with a single version of PHP and will run as the Apache user rather than the owner of a domain. If you only need one version of PHP, or don't need to have PHP to be run by the owner, than this might be a suitable solution.
The second option, CGI, has the benefit of running as the domain's user rather than the Apache user. However, it's slow and doesn’t work well with PHP opcode caching, so I would recommend avoiding this option.
The third one, FCGI/FastCGI is similar to CGI in that it runs as the user owning the domain, but it is also much faster and works with PHP opcode caching as well as multiple versions. The biggest drawback here is due to how it works it uses much more memory than any of the others. I have used it in the past, and its a suitable choice depending on your circumstances.
The fourth one, suPHP was designed for the specific purpose for running PHP scripts as the owner of the domain. Additionally with systems such as cPanel, it has safeguards in place to prevent the execution of files with improper permissions. Cons with this one is it is one of the slowest PHP handlers, and PHP Opcode caching has no performance improvement. In the past I have used this one, but in today's world I want fast.
The fifth one, PHP-FPM is my favorite one as of 2024, and stands for FastCGI Process Manager. It is essentially an improved way of implementing FastCGI and the system will run PHP scripts using the user that owns the domain. Additionally you can setup different pools for each user which can have independent settings. PHP-FPM is one of the fastest PHP Handler, works well with PHP opcode caching, works great for multi-user environments and if you need to support multiple PHP versions.
The following will explain how to setup Apache to utilize PHP-FPM with any version of PHP you have installed.
Enabling PHP-FPM
To enable PHP-FPM for your default PHP version, as well as the software collection versions you would run the following:
systemctl enable php-fpm
systemctl enable php81-php-fpm
systemctl enable php82-php-fpm
systemctl enable php83-php-fpm

systemctl start php-fpm
systemctl start php81-php-fpm
systemctl start php82-php-fpm
systemctl start php83-php-fpm
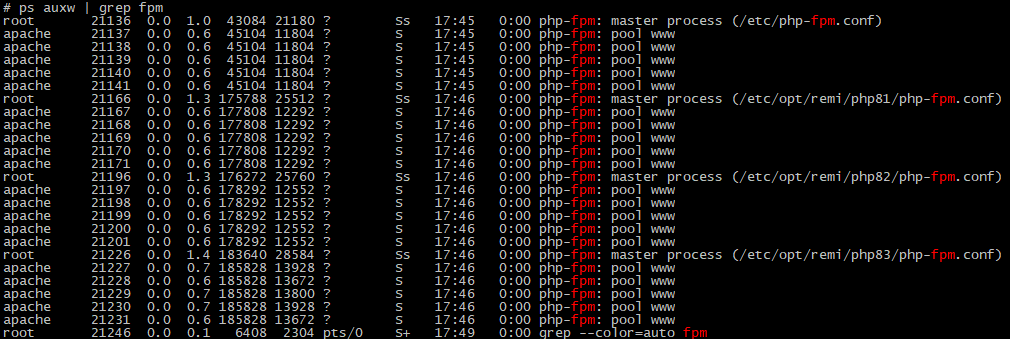
This would start up each of them and enable them so when you reboot they would start up again. This would also use the default settings for each.
Configuring PHP-FPM Pools
You can see from the last screenshot that ps auxw shows where the configuration files are for each PHP-FPM process:
/etc/php-fpm.conf
/etc/opt/remi/php81/php-fpm.conf
/etc/opt/remi/php82/php-fpm.conf
/etc/opt/remi/php83/php-fpm.conf
You will notice on the bottom of each of these master configurations an area like the following:
;;;;;;;;;;;;;;;;;;;;
; Pool Definitions ;
;;;;;;;;;;;;;;;;;;;;

; Multiple pools of child processes may be started with different listening
; ports and different management options.  The name of the pool will be
; used in logs and stats. There is no limitation on the number of pools which
; FPM can handle. Your system will tell you anyway :)

include=/etc/opt/remi/php83/php-fpm.d/*.conf
Inside the php-fpm.d directory by default is a www.conf file to represent a www pool. My recommendation here is to create unique pool per user / website where you can set the user and group to match for that particular website. Simply copy www.conf in that directory to another file such as your-website.conf and then tweak as needed. At a minimum you should change the pool name, user, group, and the listen directive. For example:
[your-website]
user = someuser
group = someuser
listen = /var/opt/remi/php83/run/php-fpm/your-website.sock
The location of the sock file will be important, as you will need this so that Apache knows where to proxy any PHP requests to.
Note: if you do not need or want the www default pool any longer, simply remove or comment out all lines in the file so that it is essentially blank. Do not remove the file, it will come back in the future with all of the default text that will enable the www pool again. By leaving the file and removing all lines the www pool will be disabled.
Once you have created your new pool(s) and are happy with your setup then run:
systemctl restart php83-php-fpm
Obviously you would replace this with whatever version you are working on, or the default version. For example to restart the default version it would be:
systemctl restart php-fpm
If you need a reminder of what PHP-FPM daemons you have running, then you can type the following:
systemctl | grep php
In my case that would look like this:

Setting up Apache to Proxy PHP Requests
With PHP-FPM running and ready to take requests for all of your installed versions of PHP, the only remaining item you have is to configure a website to proxy its PHP requests to one of your PHP-FPM daemons. To do that inside of a VirtualHost directive you would do something like the following:
# The below will forward all PHP to php-fpm
<FilesMatch \.php$>
    SetHandler "proxy:unix:/var/opt/remi/php83/run/php-fpm/your-website.sock|fcgi://www-your-website-com/"
</FilesMatch>

<Proxy "fcgi://www-your-website-com/">
    ProxySet enablereuse=off
    ProxySet max=10
    ProxySet flushpackets=on
    ProxySet connectiontimeout=5
    ProxySet timeout=30
</proxy>
You will want to ensure that you are using the correct location for your sock file. You can see that for this website I am using the one I setup with the PHP 8.3 software collection that points to /var/opt/remi/php83/run/php-fpm/your-website.sock. Since I am using a software collection version of PHP-FPM, if the default version of PHP changes for this system, it will not change for the website. This website will always use PHP 8.3 unless you reconfigure how Apache is Proxying. If you wanted the website to always use the latest version of PHP on the server, then you would have instead setup a pool on the default PHP FPM daemon, and then pointed the Apache Proxy to that.
When tweaking for performance, there can be quite a bit of settings between how you configure Apache and how it Proxies to PHP-FPM. Many configure this wrong and can end up with the dreaded proxy_fcgi:error timeout specified has expired errors in their logs. Care should be taken to configure this correctly.
Now that you have setup the PHP proxy, simply restart Apache:
systemctl restart httpd
In this case your website will now be using PHP 8.3.
Your done!


-
1
That's a very big question. The answer is don't! It's not worth the effort and confusion that follows. The way I solve this problem and the way I do ALL websites now is I create a container that uses the required version of PHP. If you don't know what a container is? it is like a small Virtual Machine. Containers can run anything that you can run on Linux. Once you have created the container, updating is as easy as updating the version in the file used to setup the container and restarting the container. There are lots of container orchestration systems, but I prefer to simply work directly with docker itself and avoid the extra learning curve. A lot of people will say orchestration is easier, and yes it is when running many sites (dozens or more) but like all such systems if you don't understand the underlying tech. when something goes wrong you are thrashing in the weeds.
— DeveloperChris
-
0
Thanks for the insight, and I do think containers is one way to go depending on your situation. Perhaps you could create a detailed answer with specifics on how to set that up with a desired version of PHP, and then what you might do when you need to change versions. For a shared server with many different users that require different versions of PHP (and the ability to change) and keep up-to-date with the latest version of PHP, I think it would probably be easier to just install multiple versions of PHP on the server and allow clients to switch as needed.
— Brian Wozeniak
-
0
I don't think recreating one of the many tutorials on how to implement a containerized php environment in Linux is a good use of my time. I would suggest reading one of the many blogs or watching one of the many videos on setting up and creating containers would cover more material and provide more insight than I could do here. Once you enter the world of containers creating a new container for a specific purpose can be done, in sometimes just seconds directly from the command line with
-
0
Understandable. I do agree with you that utilizing Docker is a popular approach that comes with many benefits. Some of the benefits you mentioned, another is to mimic production's environment, or having your developer team all utilize the exact same setup via the container (instead of each developer having to go through the process to make sure its setup the same way). I never said I haven't used Docker before, but even to go that route and setting up Docker on a new machine I would have to look up a tutorial just like you linked again to go through the process for a new machine; just like installing PHP directly. What I noticed is that many of the tutorials are not cohesive, which is why I put the question here to finally have a location on the internet with a solid answer that I can refer to next time. It isn't hard to do, generally takes a couple of minutes, what pains me is trying to find the correct information each time.
— Brian Wozeniak
add a commentdocker run ...Here is one blog tutorial. — DeveloperChris