Introduction
Here i will be showing you how to create the faint "copyright" text which you can use to help prevent unauthorised people stealing images of yours from the internet.
Three Simple Steps
To do this very simple tutorial you will need to have access to Adobe Photoshop software and about two seconds of your time. To start off please select the image in Photoshop in which you would like to copyright as i have done here (figure 1).

By selecting the text tool, type anything you wish to show within the image. In this example i've opted for the rather lame and to me the quite comical words "Hello mom" (figure 2).

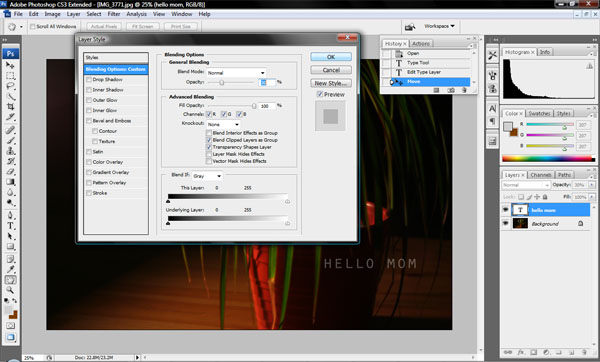
Having text on an image can be off putting, so you want to keep the photograph as clear as possible while still having the copyright text. I find the best route to go next is to change the opacity of the text to something very faint yet still visible enough to be readable. To do this you need to click on the option "Layer" then "Layer Style" before eventually coming to and clicking on the "Blending Options" option (figure 3).

You will see at the top of this "Blending Options" screen that there is the "General Blending" section which we will be adjusting here. In this example we are going to ignore the "Blend Mode" option and skip straight to the Opacity level. You can either scroll the bar to the left and right or alternatively just simply type in the amount of opacity you would like to have your text sitting at. I've chosen 30% in this example (figure 4), however it all depends on the actual image you are using and where you place the text.

Conclusion
This tutorial has covered some very basic tools used on Photoshop which will hopefully be used help protect your images from being stolen from unauthorised users.
All the best,
SB
This page was published on It was last revised on