Occasionally I like to run an A/B test to figure out what version of a web page does a better job at meeting my goals/objectives. While there are many 3rd party A/B testing websites that you can easily use for this, I wanted to be able to perform these tests as natively as possible using Google Analytics 4 (GA4). I successfully did this with Universal Analytics (UA) using custom dimensions, so the purpose of this tutorial is to be able to do the same with GA4.
Requirements / Assumptions
The first requirement which is mostly out of the scope of this article, is performing the A/B test. The goal here is to be able to report the A/B test results, not managing or creating the A/B test itself. That part is done outside of GA4. For instance, you should have a way to create a version A and B of your test; for Ozzu we utilize PHP for this. When someone visits a web page at Ozzu their session randomly is put into a certain group. Depending on what group they are in they will see one of the versions of the test. In the actual HTML that loads for the user, I have GA4 loading its code, but in addition, the version of the test will be passed via GA4 user property associated with the page_view event. This article is going to focus on the latter portion.
Note: Originally when I set these up I used GA4 event parameters which were associated with custom dimensions that had a Scope of Event. While this sort of works, the problem is that when looking at reports the data will only be associated with any event in which you pass these event parameters. The drawback here is that if you initiate an AB test, for example, they land on a special page for group A, you would then need to set these event parameters on all future events triggered by the user for you to have it associated with the AB test group. This is the benefit of using GA4 user properties instead, as once you set a user property the user is then placed into that bucket for all future events without having to send anything more to GA4. This will allow you to create different audiences or segment the data appropriately. I also looked more into how I had set this up in the past with UA and found that with those they were set up to be session-based scopes, however, GA4 at this point does not support that; however, I have heard rumors they may in the future. Currently, the only GA4 scopes that are supported are Event, User, and Item. You can learn more about what User scopes are, and why they would make sense to use for an A/B test because we want to place the user in a bucket to properly segment them from the other buckets or group of users:

GA4 Custom Dimensions
One of the first requirements is creating the custom dimensions that we will use to record the results of the A/B test, and also to be able to distinguish one A/B test from another past or future A/B Test. The following video will briefly go over what custom dimensions are:

Keep in mind that once you create a custom dimension, it may take up to 24 to 48 hours for the data to process before you can use that dimension in reports. I recommend completing this step first so that the processing time begins sooner; this way, you won't have to wait as long once you complete the other necessary steps. If you decide to address this step later and complete the rest of the tutorial, any data sent to GA4 will only be attributed to the custom dimension AFTER you have created the custom dimensions, and AFTER the additional 24 to 48 hours it takes before you can utilize it. Any past data will not be attributed. So do this step now.
For our A/B testing, we are going to create two Custom Dimensions:
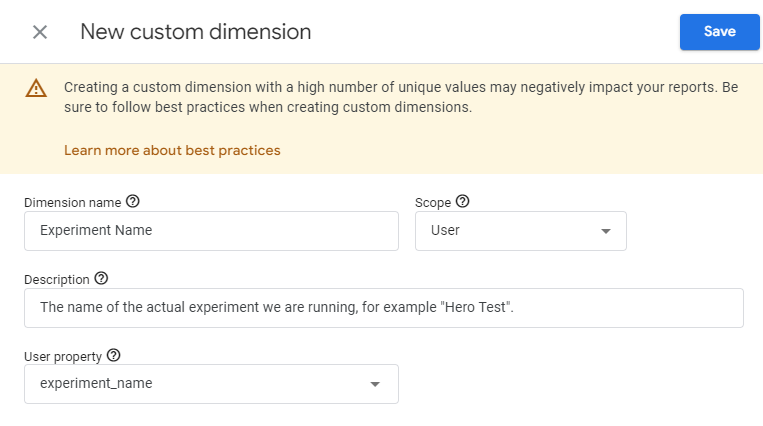
- Experiment Name: The name of the actual experiment we are running, for example "Hero Test".
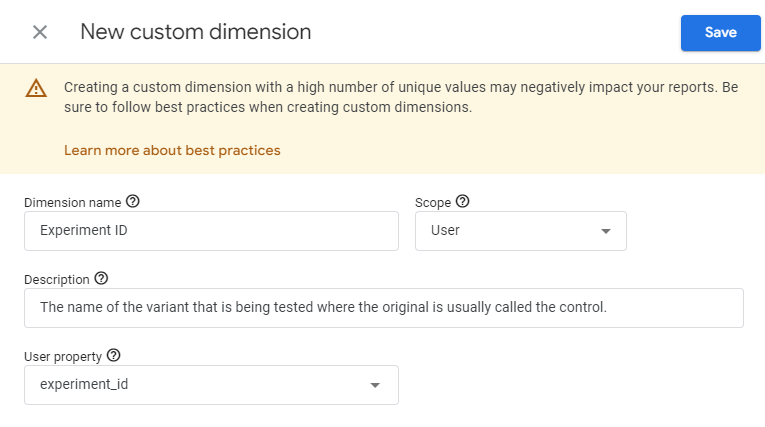
- Experiment ID: The name of the variant that is being tested where the original is usually called the control.
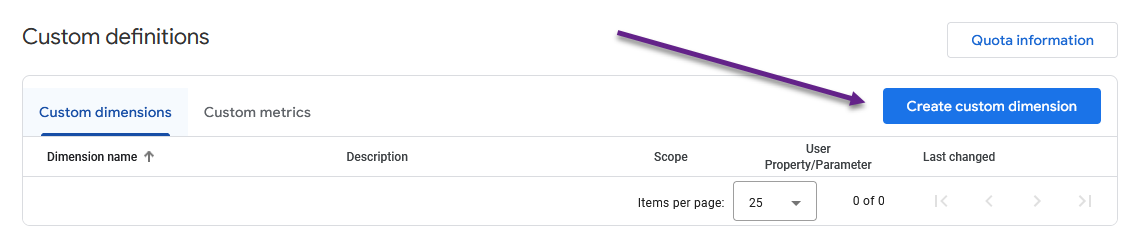
In GA4 head to the admin section by clicking on the gear icon on the bottom left. Next, expand Data display and click on Custom definitions.
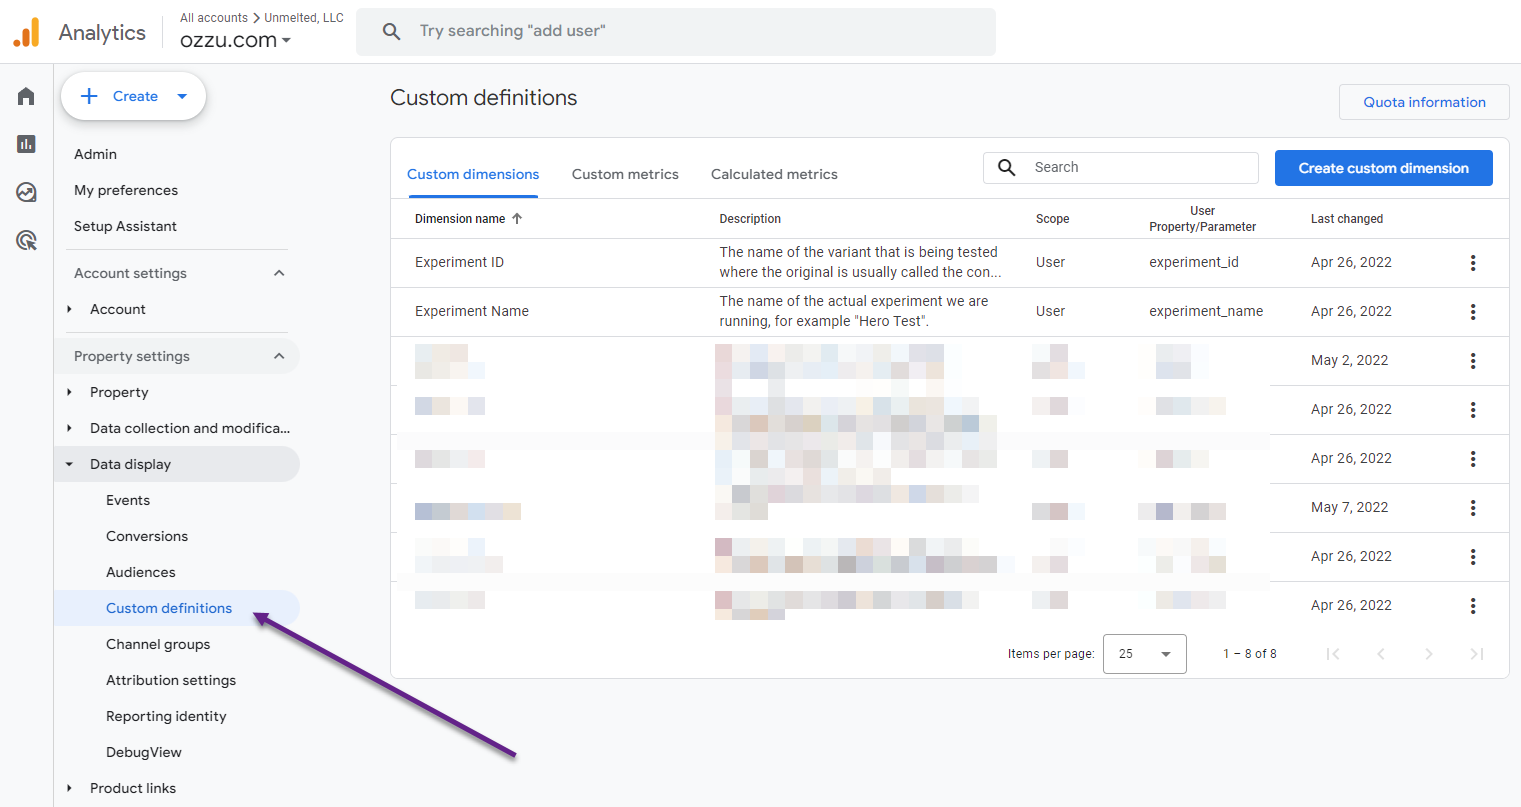
You will then see a page where you can create Custom Dimensions or Custom Metrics. Click the big blue button that says Create custom dimension.
Now add the Experiment Name dimension which has a scope of User, a description, and User property set to experiment_name.
Then, similarly add the Experiment ID dimension, which also has a scope of User, a description of whatever you would like, and User Property set to experiment_id.
Great, now we have the two needed dimensions to move forward. Either sit back and relax for the next 24-48 hours, or move forward knowing that you may have to wait before you see data starting to populate.
Recording GA4 Dimension Data for A/B Test
Now assuming you have whatever logic in place to show either Test A or Test B webpage, you need to send dimension data to GA4 depending on what page is loading. With GA4 you can do this for event-based scopes via sending Event Parameter data, and for user-based scopes via sending User Properties. Since we are going to be using User Scopes, we will do that via the GA4 page_view event. So for example, assuming we are testing a Hero image on our home page we would want to send the following user property data when the home page loads using the control (the old hero image):
- experiment_name: hero_test
- experiment_id: control
When we load the variation of the home page that shows the new hero image we want to test, then that page will send the following user property data instead:
- experiment_name: hero_test
- experiment_id: new_hero_image
There are multiple ways you could communicate this data to GA4.
Setting GA4 User Properties via Google Tag Manager (GTM)
If you use Google Tag Manager, for instance, you might simply pass this information via the data layer to GA4:
window.datalayer.push({"experimentName":"hero_test","experimentID":"control"})
or
window.datalayer.push({"experimentName":"hero_test","experimentID":"new_hero_image"})
From there you would set Google Tag Manager to pass this information to GA4 by first associating the datalayer information to a variable in Google Tag Manager:
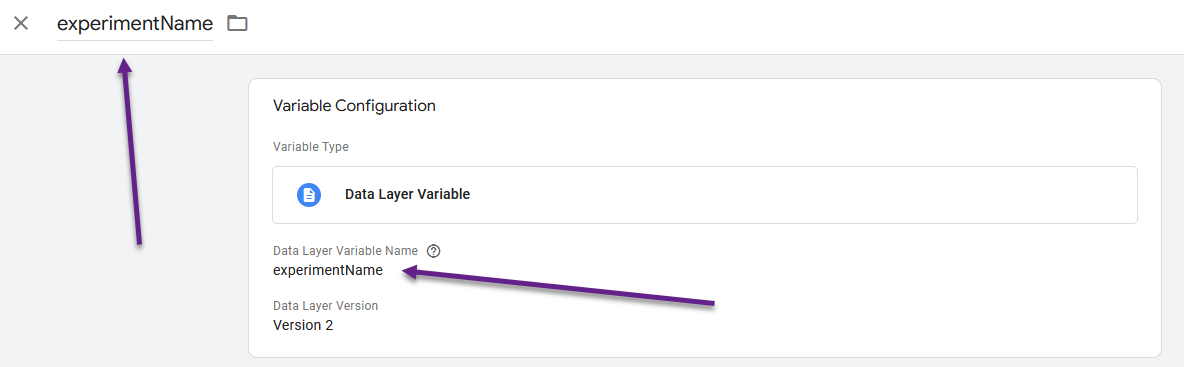
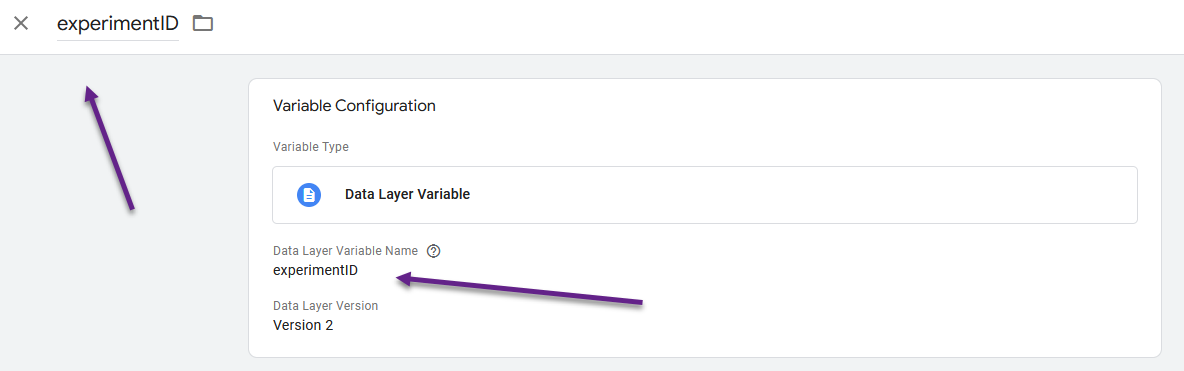
This will take the data layer variables called experimentName and experimentID and associate them to Google Tag Manager variables also called experimentName and experimentID. Please note that in our first step when setting up the custom dimensions for GA4 we used experiment_name and experiment_id for the event parameter names (snake_case vs camelCase). If you mix up naming conventions or choose to call variables something else, you may find yourself getting confused. I did this on purpose in this tutorial to illustrate that it really doesn't matter what you call these variables, but you will have to ensure that you associate everything correctly which means you will have to have a good understanding of how everything links together. I would suggest that you are consistent in your naming convention throughout, then you won't have to think about it, but I wanted to point this out.
So with our variables set in Google Tag Manager using a different naming convention, we are now going to associate these user properties with the GA4 Google Tag via creating a new GA4 Event. To do this goto your tags section and create a new tag which will look like this once you set it up:
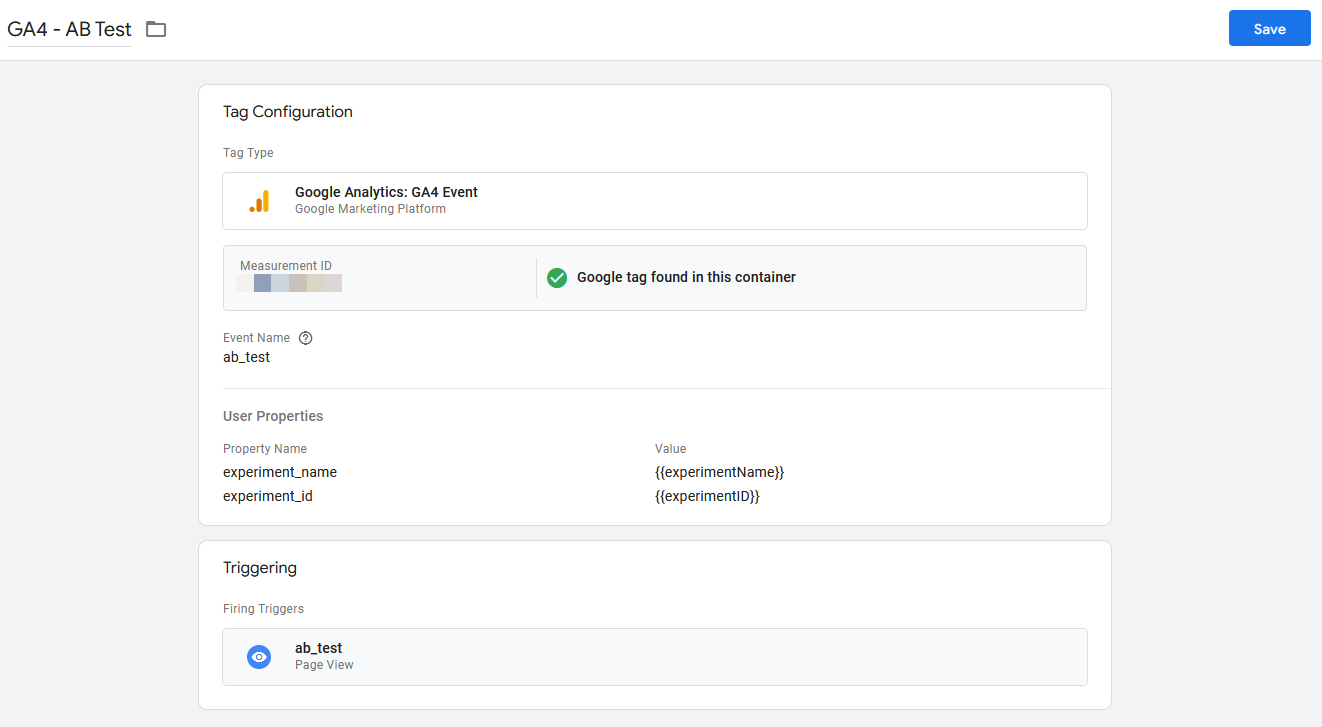
At the top name the tag GA4 - AB Test, then for the Tag Type select Google Analytics: GA4 Event, then set your Measurement ID which would be identical too your Google Tag, call the Event Name ab_test, set the User Properties section to include both experiment_name and experiment_id, and finally setup the Triggering section to fire this event. When creating the trigger create a new trigger that will look like this:
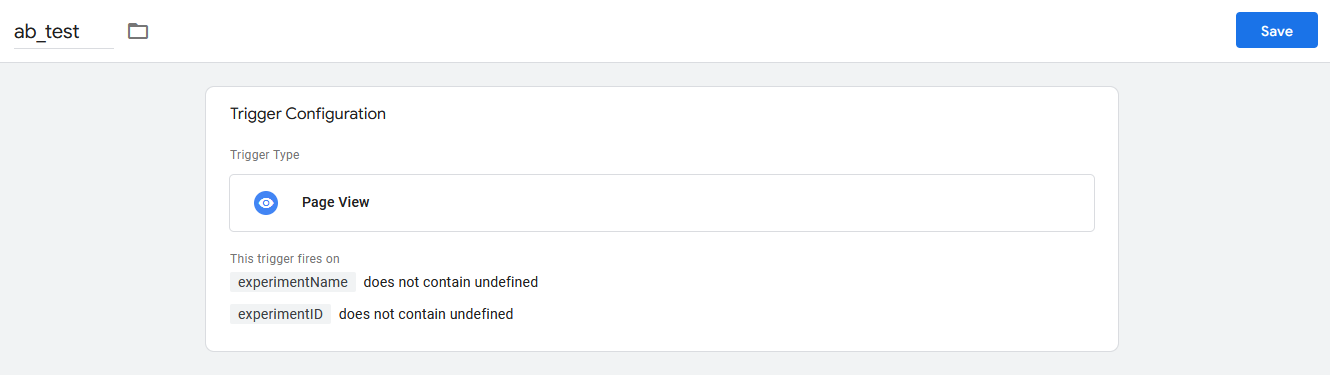
For this one we simply called the trigger ab_test with the trigger type being Page View, but we selected to only have it fire on some pages when both the variables experimentName and experimentID do not contain undefined. Remember these are effectively set via the Datalayer, so when they are not present in the Datalayer, this trigger won't happen and the GA4 - AB Test event will not occur.
Setting GA4 User Properties via Gtag
You can also do this without Google Tag Manager if you are adding the GA4 tracking JavaScript code yourself. In addition to the GA4 tag that you add, you would need to ensure that the user property data (our dimensions) are being passed as well by adding the following Javascript before you send the page_view event:
gtag('config', 'STREAM_ID', {
    send_page_view: false,
});

gtag('set', 'user_properties', {
    experiment_name: 'hero_test',
    experiment_id: 'control'
});

gtag('event', 'page_view');

...
Alternatively, you can set it for a single stream in the config by doing something like this:
gtag('config', 'STREAM_ID', {
    send_page_view: true, // default, but just to illustrate your other params would go here too
    user_properties: {
        'experiment_name': 'hero_test',
        'experiment_id': 'control'
    }
});
The important takeaway here is that to send user property or event parameter data, you have to send an event. If you only have one test loading on the page, then it makes sense to attach that to the page_view event which is typically sent by default by just adding GA4 tracking code. The above example shows how you can disable that to set the additional event parameter data that needs to be sent with the event, or alternatively and likely easier just setting it as configuration data. However, you could also simply create a new event like we did above for Google Tag Manager to send the user property data with, such as something you made up, for example, an ab_test event:
gtag('event', 'ab_test', {
    user_properties: {
        'experiment_name': 'hero_test',
        'experiment_id': 'control'
    }
});
In the case of Ozzu, we went a step further to create a PHP Class that handles inserting Gtag JavasScript code, so that anywhere in our logic we can trigger the use of setting GA4 information and it will automatically be inserted into our footer so GA4 can load with the proper event data as needed. This is out of the scope of this article, but this can illustrate how far you can take something like this:
    public function handle($request, Closure $next, $guard = null)
    {
        Gtag::config('cookie_domain', '.' . URL::getDomain(config('app.url'), 2));
        Gtag::config('content_group', $this->getContentGroup($request->route()->uri));

        $loggedIn = Auth::guard($guard)->check();
        Gtag::dimension('logged_in', $loggedIn);

        // AB Test
        Gtag::userProperty('experiment_name', ABTest::getExperimentName());
        Gtag::userProperty('experiment_id', ABTest::getExperimentID());

        return $next($request);
    }
With this example PHP code you can see how we can set configuration, dimension, or user property data and the class takes care of creating the proper Javascript and inserting it correctly in the footer. Again not needed, but depending on the complexity of your website something you might want to do.
Creating A/B Test Results Report in GA4
If you have properly implemented the above, are now sending AB Test data into GA4, have setup the GA4 custom dimensions, and have waited for processing of those to complete (24-48 hours), then you are ready to start seeing AB Test reports in Google Analytics 4.
GA4 Exploration Report
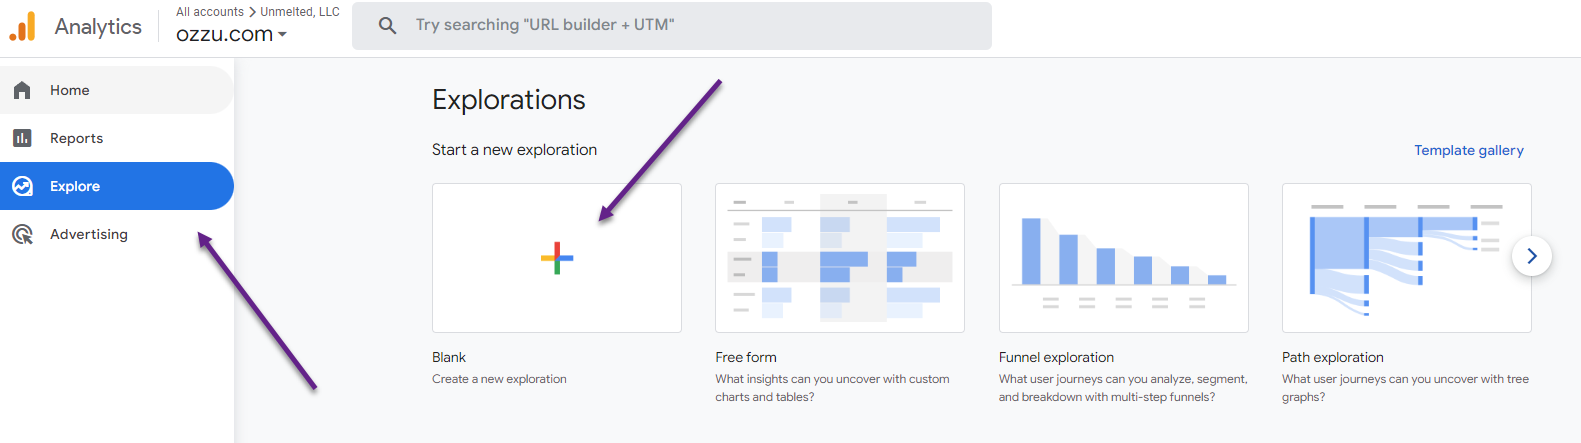
One way you can see the test results for an AB test is by creating an Explorations Report. Head to the Explorations section and then click Blank:
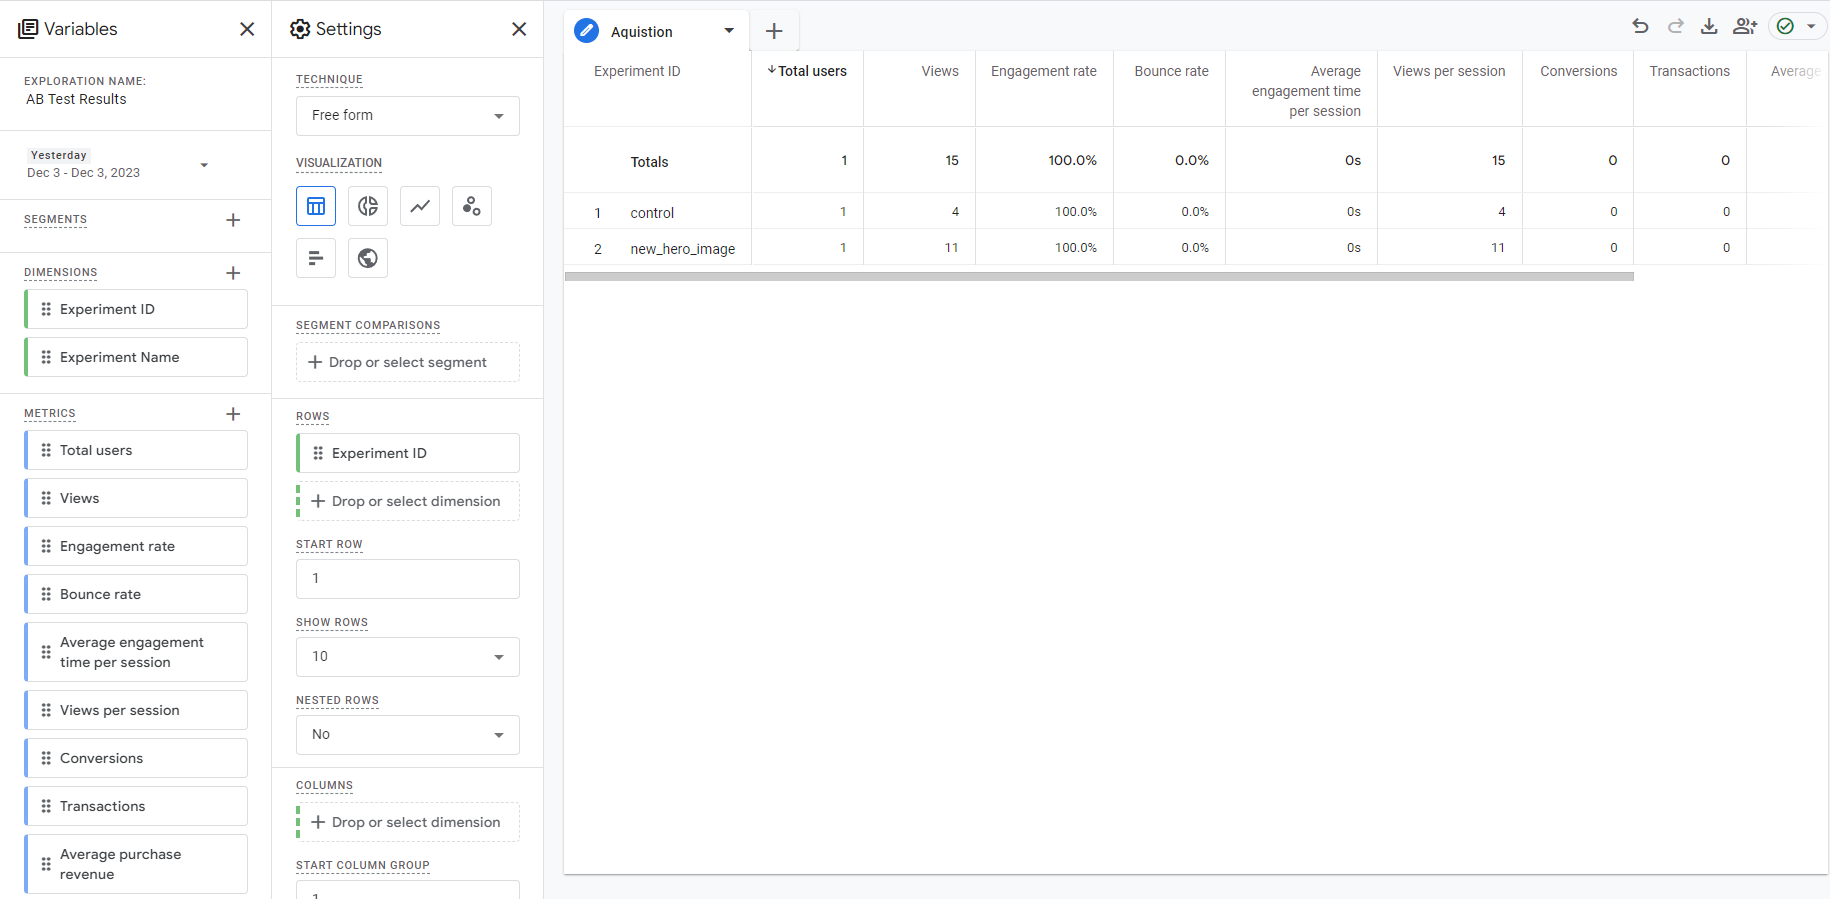
Then perform the following steps under the Variables column:
- Set Exploration Name to AB Test Results
- Set the time period, in my case I chose the last 28 days.
- Click the plus symbol next to Dimensions and add both Experiment ID and Experiment Name which we added at the very beginning of this tutorial.
- Click the plus symbol next to Metrics and add whatever metrics you want to see data for. In my case, I added: total users, views, engagement rate, bounce rate, average engagement time per session, views per session, conversions, transactions, average purchase revenue, and purchase revenue.
Then update the Settings column:
- Under Rows drag over or select Experiment ID so that data will be separated into different rows for different AB Test variations.
- Under Values I brought over every Metric I selected under the Variables column.
- Finally for Filters I selected Experiment Name and set it to
hero_test. What this will do is make sure that the only data being shown in this report is from that AB Test. As you conduct more AB Tests you would simply change this filter to show results for another AB Test.
After making all of these changes you should see something like this:
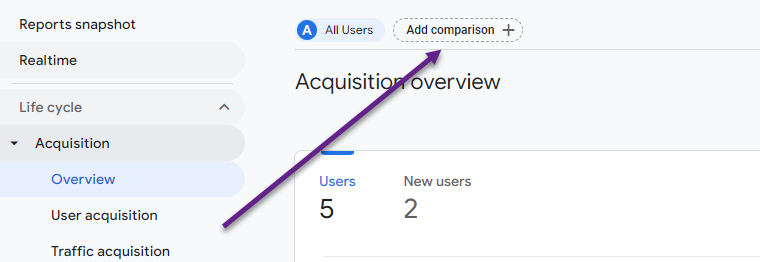
GA4 Report Comparisons
You can also compare the test results in regular GA4 reports by adding a comparison which is at the top of any report. You will find something like this:
Once you click that the right sidebar will open up and let you build up and add a comparison. So for example you can see what I did to add both the control and the new_hero_image:
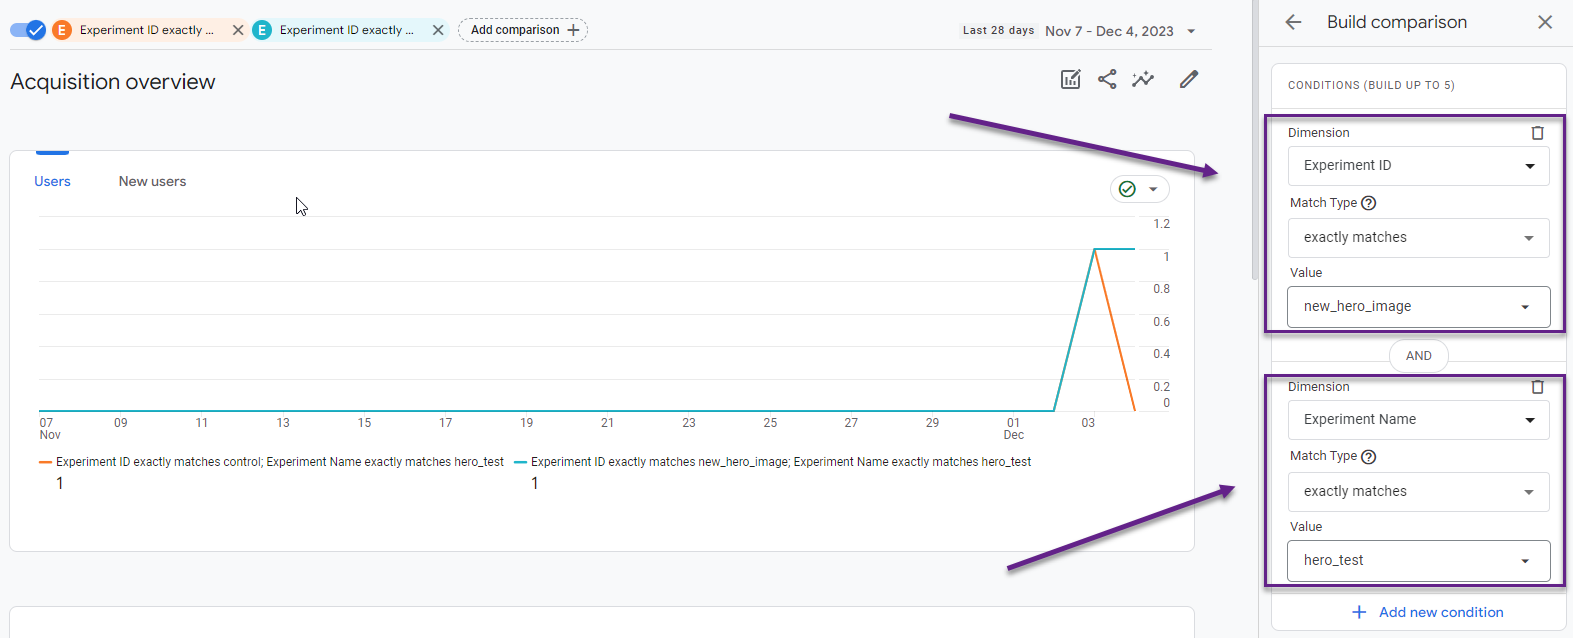
When you add your variations, you may also want to add the Experiment Name as well like I did in the screenshot if you have the possibility that some of your Experiment IDs are the same. If they are all unique you may be able to leave that out.
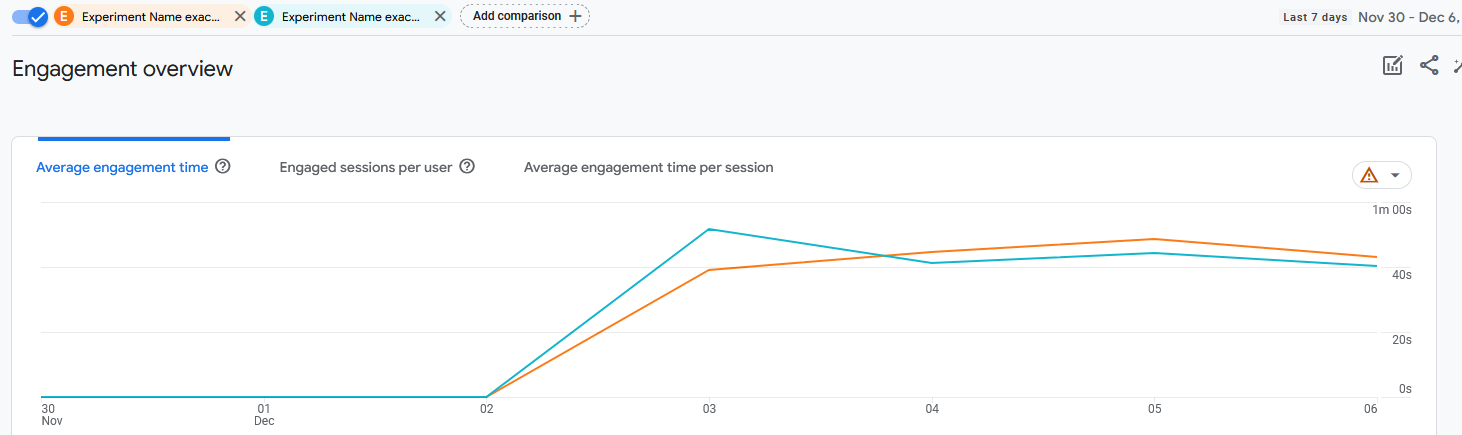
Finally if All Users is still up there, then hit the X by it so that just your two comparisons show and you will see a graph like the above. This graph is not that useful, but you can see how it's separating the traffic to plot as separate colors. If I were to use this on the engagement report, I could see what variation of the test has higher engagement time for instance:
Final Words
Figuring out how to conduct A/B tests with Google Analytics 4 was a bit of a challenge, but I believe it will empower you to be able to seamlessly conduct experiments, gain insights, and optimize web experience without relying on 3rd party systems. By harnessing GA4's native capabilities and custom dimensions, you can tailor experiments to your specific needs, ensuring flexibility and control over the testing process. The ability to utilize GA4 for A/B testing will not only help facilitate a more holistic understanding of user behavior but will lead to data-driven decisions and continuous improvement in website performance.
This page was published on It was last revised on