Introduction
Welcome to PART II of Photoshop slices! If you Haven't read part I then I suggest you do so as this tutorial will assume you have, and restart from where we left off at the first half. If you'd like to read PART I, you can find that here. Remember to download the zip file and extract the psd so you can work alongside me while I teach you all about the slices and the "Save For Web & Devices" dialog box.
Save For Web
Let's jump right in from where we left off earlier:
Click on File>Save For Web And Devices
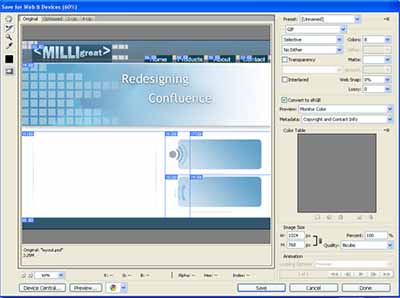
Finally we've made it, the save for web dialog. This is where all the magic happens. Where slices are not bound by the document in which they reside, and can roam free as individual files. It's also where Photoshop creates an entire HTML markup for your layout, inserts text, images, and background colors, as well as optimizes each image individually.
The reason optimization is important is because we want our page to load in a reasonable time frame. Think about a dial-up user who is trying to visit your site and how long they will have to wait for an uncompressed, unoptimized image to download for viewing. For a complex site this could take anywhere from 2 minutes to 2 hours! Let's make it easy for them by making our image files a bit smaller so they load quickly.
Take a moment to familiarize yourself with the interface, taking note of the different parts:
- The display option (tabs at the top)
- The toolbox on the far left hand side
- The image optimization panel on the far right
- The preview panel at the bottom
What we're going to focus on is setting up our user and layer slices for optimization and "linking" some slices together. Take a close look at the upper left corner of one of the auto slices, see the small symbol that sort of looks like an "s" or an "8"? This is actually two chain links and it represents that this slices' color palette matches the slice adjacent to it. Linking slices allows Photoshop to match color palettes or optimization changes for two or more adjacent slices.
See how there's a gradient applied to the background of the smaller text areas in the body? There's a chance that when we compress the slice around the symbol and the slice around the rest of the area, that there's going to be a "seam" between the two images when they are put back together in the markup. To avoid this, we'll link the layers so that they have matching colors where they adjoin.
In your save for web dialog box, select the slice that surrounds the symbol on the top-right text area. Now hold down shift and click on the slice to the immediate right of it. Now that you have 2 slices selected, look to your optimization panel.
Just next to the title of the "Preset" section there is a small icon which contains a down arrow and a number of horizontal lines. Click on this icon and choose "Link Slices" from the menu that appears.
The symbols on the top left corner of your slices now appear as a different color to indicate that they are linked. Do the same thing for the 2 slices just beneath the ones you just linked. These slices will change to a new color as well. Now we can be sure that the gradients in the two pairs of linked slices will match their respective pair.
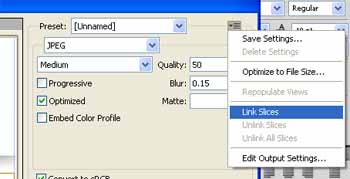
Choose a slice in one of the pairs and change its preset to" jpeg Medium." Let's take a closer look at the changes between what the original preset looks like, and what the preview of the saved file looks like. In your display tabs, choose the third one in the list entitled "2-Up." This allows us to see both the original image, uncompressed or optimized; as well as the optimized and compressed preview. Zoom in to the slice we're working on and take a look around the symbol of the optimized preview image.
I see a few artifacts here so we'll up the preset quality from 30 to about 50. You can find this in the optimization area in the preset section where we changed to "JPEG Medium." 50 looks about right, only a few small artifacts seen now; and to get rid of those we can use the blur functionality, built right into the same panel area. Set the blur to about 0.15 to get rid of the rest of the artifacts.
Apply the same steps to the next set of linked slices we created until you're happy with the results.
The reason we used jpeg compression here is because it had a gradient with many colors. Any time we have a slice with a lot of variances in hue, or saturation it's best to use jpeg because it compresses complex images better than a format that holds a color palette such as gif or png files.
Now select the larger area to the left of the symbols where we intend to put the main textual content of the page. Here we have a large amount of white space and 2 very thin gradients that move from a grey to a light grey. Though there aren't many colors involved here; it's a larger image so jpeg again will be best. Use your own discretion to optimize this slice as a jpeg until you think it looks right. When you're done, optimize the banner and logo as well.
Let's move along to the navigation tabs. Since they all look the same, let's link them so that we only need to optimize one and let the rest take on the same optimization. Using the slice select tool from our toolbox; click on the first navigation tab and then hold down shift while selecting the rest.
Link the navigation tabs and then select one of them to work with and zoom in close to it. Here we have a small slice, with mostly a solid color except for the few colors in the area where the corners round off. Considering these parameters, we can assume that it would be best to optimize them as GIF files. From the preset drop-down menu in our optimization palette, choose "GIF 32 No-Dither." Set the "colors" to around 8. At the bottom of the "Optimized" window shows some information on our file.
Note the file size of the image as less than 1Kb. This is why we use GIFs instead of JPEGs when dealing with small images and few colors.
Let's finish the optimization off by selecting all of the auto slices in our layout and setting them to "JPEG Medium," then setting the quality to around 60 and the blur to 0.2.
If you'd like to you can preview the finished product by clicking the "Preview" button in your preview panel at the bottom of the dialog box. I recommend doing this to ensure you don't have any seams show up and are happy with your jpegs before saving the files. If you see any problems; go back to Photoshop, select the appropriate slice, and adjust it to your liking.
Finally we're ready to save the files and create our HTML markup. In your "save for web" dialog box, click on the "Save" button on the bottom right hand corner. Type in "index" in your Save As input field, and choose "HTML And Images" from the drop-down menu below it. In the "Slices" drop-down menu, choose "All Slices." Click ok.
Conclusion
We've learned so much today! The slice tool is very powerful and oftentimes overlooked. There are many options involved that can save a massive amount of time. Now that you know how to slice your images and optimize them for the web, you can use slices to realize and implement a layout that resides in your imagination, and then use Photoshop to start the markup for your layout. Great job getting through this tutorial and I hope you'll be able to use it to your advantage in your web design career.
P.S.There are many more options in the save for web dialog that I haven't gone over; but I wanted you to get the feel for how to use the popular save for web option. Expect me to add on to this tutorial in the future 🙂
This page was published on It was last revised on