Introduction
It will be obvious (from the title if nothing else) that this tutorial was completely inspired by digitalMedia's superb tutorial on Photo-realism Techniques in Vectors. Similar to Chris's tutorial, this isn't necessarily a step-by-step how-to, but rather an example of what can be done. Giving credit where credit is due, the example presented below was not self-generated but rather an example is given from the individual who wrote the includes used in this POVRay creation, specifically, Jaime Vives Piqueres - http://www.ignorancia.org/. It's my hope that this tutorial will generate some interest in the possibilities available from Ray Tracing.
Tools Used
POVRay 3.6 (Persistence of Vision Ray Tracing)
Fruit Texturing II Include Files obtained from here
Code Example
As noted the code below is not mine, and I've left the credit intact. Basically, inspired by dM's work, I wanted to find out if I could do something similar with POVRay and generate a photo-realistic apple. Didn't take but a few searches to find the includes linked to above.
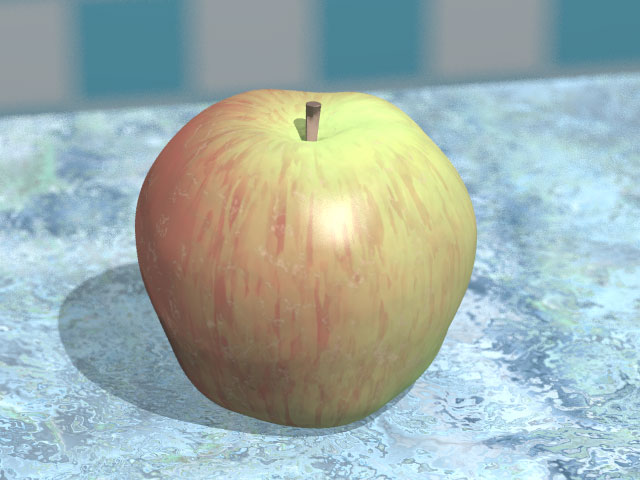
I'll start with the end result - the apple.
Here is the code used to generate the apple, the marble table, and the background.
                                  /*

 /*

   Fruit texturing example: fuji apple

   --
   Jaime Vives Piqueres, Jun-2002.

   jaime@ignorancia.org
   http://www.ignorancia.org

   --

   This is a demonstration scene for my fruit texturing macros. The trick
   consists of using a radial pattern to distribute rotated copies of another
   pigment, which uses also rotated copies of a third pigment, following the
   slope y pattern.

   This complex pigment is used as the second layer of a multilayer texture,
   to give the typical apple skin stripe, with some transparency to show a
   lower base layer. Another third layer on top of these helps to integrate
   (soft/hide) the "longitudinal stripe" (in this example this third layer is
   also, a two-layer texture, to add the finish and little speckles).

   See "i_fruitext.inc" for the details...

*/

// *** global ***
#version 3.5;
global_settings{
 noise_generator 2
 max_trace_level 8
 assumed_gamma 1.0
 ambient_light 0.0
 radiosity{
//  nearest_count 10 error_bound .5
 }
}

// *** standard ***
#include "colors.inc"
#include "textures.inc"
#include "woods.inc"
#include "stones.inc"

// *** common and control variables ***
#declare use_table=1;
#declare use_blur=3; 	//(x8 = samples)
#declare hf_res=1;
#declare r1=seed(930);  // apple seed
#declare r_l=seed(1003);  // light pos. seed

// *** fuji apple colors, pigments and textures ***
// basic pigments
#declare p1=Firebrick*.5+OrangeRed*.1;
#declare p2=Yellow*.8+White*.1;
#declare p3=YellowGreen*.8+White*.1;
// base texture (bottom layer)
#declare t_base=
texture{
 pigment{
  cylindrical
  turbulence .25
  color_map{
   [0.0 p1]
   [0.2 p1]
   [0.7 p3]
   [1.0 p2]
  }
  scale 5
  translate 1
 }
}
// pìgment for the radial-slope texture ("stripes", second layer)
#declare p_stripes=
pigment{
 pigment_pattern{
  bumps
  turbulence .5
  lambda 2
  scale <1,7,1>*.15
 }
 color_map{
  [0.0 p1]
  [0.45 p1]
  [0.45 p1 transmit .9]
  [1.0 p1 transmit .9]
 }
}
// *** "soft/hide" texture (third layer), with additional "dirty" layer ***
#declare t_upper=
texture{
 pigment{
  cylindrical
  turbulence .25
  color_map{
   [0.0 p1 transmit .8]
   [0.2 p1 transmit .6]
   [0.7 p3 transmit .1]
   [1.0 p3 transmit .0]
  }
  scale 4
  translate 1
 }
}
texture{
 pigment{
  granite
  turbulence .5
  lambda 3
  color_map{
   [0.00 DarkGreen*.5 transmit .1]
   [0.1 DarkTan transmit .5]
   [0.20 DarkGreen transmit .8]
   [1.00 DarkTan transmit .9]
  }
 }
 normal{
  granite .1
  turbulence .5
  lambda 3
  scale .01
 }
 finish{
  phong .3 phong_size 40
  reflection {0,.01}
 }
 scale 4
}

// *** create the final texture ***
#include "i_fruitext.inc"  // fruit texturing macros
#local t_apple=m_radial_sloped(t_base,p_stripes,t_upper,r1)

// *** apply the texture to the apple ***
#include "i_apple.inc"     // apple object
#declare o_apple=object{apple(seed(11),t_apple)}
object{o_apple rotate 360*rand(r1)*y translate <0,82.5,1>}

// *** testing scenario ***
// marble table
#if (use_table)
#declare p_base_marble1=
pigment{granite turbulence .05 scale .5 translate 33}
#declare p_base_marble2=
pigment{crackle turbulence .1 scale 1 translate 333}
#declare p_marble=
pigment{
 bozo turbulence 1
 pigment_map{
  [0.00 p_base_marble1]
  [1.00 p_base_marble2]
 }
 scale .2
}
#declare t_marble=
texture{
 T_Stone26
 scale 4
 finish{
  reflection{.01,.1}
 }
}
height_field{
 function 512*hf_res,512*hf_res{
  pigment{p_marble}
 }
 texture{t_marble}
 translate -.5
 scale <30,.05,30>
 translate <1,80.2,4>
}
// room
box{-.5,.5
 hollow
 scale 500
 pigment{
  checker color SummerSky color White
  scale 15
 }
}
plane{y,249 pigment{White}}
plane{y,-249 pigment{Gray}}
#end

// *** lights ***
light_source{
 <50,230,-100>
 White*30000
 fade_distance 1
 fade_power 2
}
box{-.5,.5
 material{
  texture{
   pigment { color rgbf<1, 1, 1, 1> }
   finish {  diffuse 0 }
  }
  interior{
   media {
    method 1
    emission 10
    intervals 10
    samples 1, 10
    confidence 0.9999
    variance 1/1000
   }
  }
 }
 hollow
 no_shadow
 scale <50,10,50>
 translate <50,231,-100>
}

// **************
// *** camera ***
// **************
#declare desde=<-10,80+31,-55>;
camera{
 location desde
 direction 3.2
 look_at <.1,84.5,0>
 #if (use_blur)
 focal_point <.1,83.9,0>
 aperture 2
 blur_samples 8*use_blur
 variance 0
 #end
}
What Exactly Is Happening In the Code
For those who've never used POVRay, in a nutshell, the images are generated with programming code. It looks a little intimidating at first, however, anyone familiar with any kind of programming language can pretty much figure out intuitively what is going on. POVRay code can use a variety of include files (.inc). Essentially you can relate them to "classes" - simply reusable code. For example, you'll notice in this application that several common include files are included to create various colors, textures, woods, and stones -- all defined in the respective include files (these particular include files are included with the POVRay application. Experienced users can also write their own include files, but others can be found, in most cases free, on the internet).
// *** standard ***
#include "colors.inc"
#include "textures.inc"
#include "woods.inc"
#include "stones.inc"
For the generation of the apple, two other include files are used (linked to in Tools Used) -- i_fruitext.inc and i_apple.inc. These two includes contain three macros designed by the author that essentially define the attributes used to create the apple object.
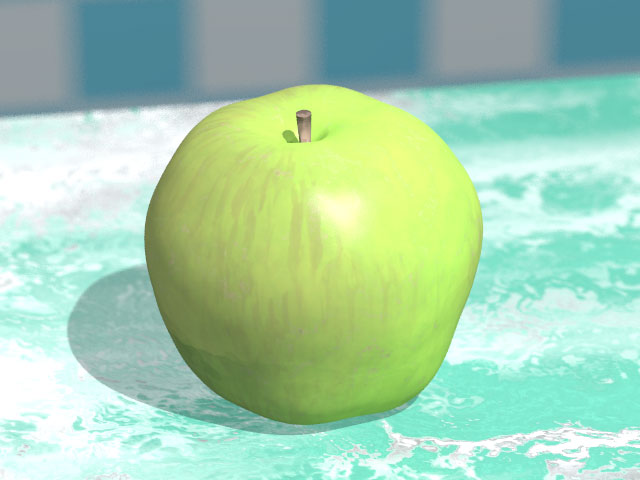
Altering The Code to Produce Variants
Personally, I prefer green apples to red, so I made some modifications to demonstrate how altering the code, alters the image. In POVRay oftentimes images can be altered by various random "seeds" In this case there are two seeds that can be altered -- the apple seed itself (930 different seeds) and the light position (1003 seeds):
#declare r1=seed(930);  // apple seed
#declare r_l=seed(1003);  // light pos. seed
In the original, he used seed 11. I changed that to seed 800 to alter the shape of the apple. I didn't change the light position.
I also altered the pigments used from:
// basic pigments
#declare p1=Firebrick*.5+OrangeRed*.1;
#declare p2=Yellow*.8+White*.1;
#declare p3=YellowGreen*.8+White*.1;
to:
// basic pigments
#declare p1=YellowGreen*.5+OrangeRed*.1;
#declare p2=GreenYellow*.8+White*.1;
#declare p3=MediumSpringGreen*.8+White*.1;
Obviously changing the reddish-yellow color of the apple to a green color
Finally, I changed the texture of the marble table from T_Stone26 to T_Stone18:
#declare t_marble=
texture{
 T_Stone26
 scale 4
 finish{
  reflection{.01,.1}
 }
}
to:
#declare t_marble=
texture{
 T_Stone18
 scale 4
 finish{
  reflection{.01,.1}
 }
}
Other than that, I made no other alterations to the code, although obviously, the possibility for changes is endless. I will make one last note on the code for those new to POVRay that in all cases, you have to define your camera. Anyone familiar with photography can figure out intuitively what this code does.
// **************
// *** camera ***
// **************
#declare desde=<-10,80+31,-55>;
camera{
 location desde
 direction 3.2
 look_at <.1,84.5,0>
 #if (use_blur)
 focal_point <.1,83.9,0>
 aperture 2
 blur_samples 8*use_blur
 variance 0
 #end
}
And the end result -- my green apple:
Conclusion
I simply hope that this motivates some of you to look into the incredible world of ray tracing.
This page was published on It was last revised on